A study on the effect of time in tempering medium-carbon steel, when the following conclusions were reached: It is not fair to consider the question settled when only three specimens were used for each treatment, but the results obtained indicate that for reheating quenched medium-carbon steel to temperatures below 500° it is only necessary to heat it through. Longer heating has little or no effect on the tensile strength, ductility, or hardness. At temperatures above 500°, increasing the time of treatment causes a slight falling off in hardness and tensile strength with a corresponding increase in ductility.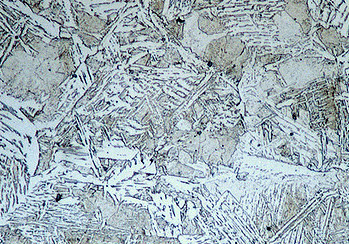
In the discussion of the paper these conclusions were attacked and evidence presented that seemed to throw doubt on their accuracy. The authors, however, showed that this evidence was based on high-carbon or alloy steels and no facts regarding medium-carbon steel were presented.
During this study the heat treatment was carried out in a small electric resistance furnace. It held nine specimens, but when these were placed in the furnace the temperature was lowered to such an extent that 30 to 40 min. were required to reach the desired heat. The authors pointed to this as a weak point in the investigation and it seemed wise to supplement the research by work on similar steel but using a different method of heating. This has been done and the results are given in the present paper. The Rhode Island Tool Co. cooperated by furnishing the steel and turning the tensile specimens.
The steel used in this investigation came in three bars ¾ in. in diameter; analyses are as follows:

HEAT TREATMENT
The specimens were quenched at 850° C. and then reheated in lots of three for 5, 15, 30 min., 1, 2, and 4 hr. at 300°, 400°, 500°, and 600° C. Three specimens cooled in the furnace, from 850° C., and three were tested in the quenched condition.
The bars were cut into 5½-in. (13.97 cm.) lengths and heated in a No. 1 oven furnace made by the American Gas Furnace Co. The furnace was heated to 900° C. and one third of the specimens introduced on an asbestos board that was supported 2 in. (5 cm.) above the bottom of the furnace. This lowered the temperature to about 800°, but after 20 min. it rose to 850°, at which point it was held for 10 min. Then the asbestos board was removed and the specimens quickly dumped into a tank of water. This operation was repeated until all but three of the specimens were quenched; these were allowed to cool in the furnace.
The quenched specimens were reheated, in lots of three, by immersing in a gas-heated pot containing about 75 lb. of type metal. The introduction of the specimens caused no appreciable change in the temperature of the metal and a constant temperature was easily maintained. The three specimens were fastened to an iron rod, to hold them below the surface of the metal and to facilitate their removal. After reheating for the desired time, the specimens were removed from the pot and quickly plunged into water.
MARKING AND PREPARING THE SPECIMENS
Previous to quenching the specimens, a system of marking was devised to make identification easy. The first number indicates the temperature of reheating, 3 = 300°, 4 = 400°, 5 = 500°, 6 = 600°. The second number indicates the bar number, 1, 2, or 3. The third
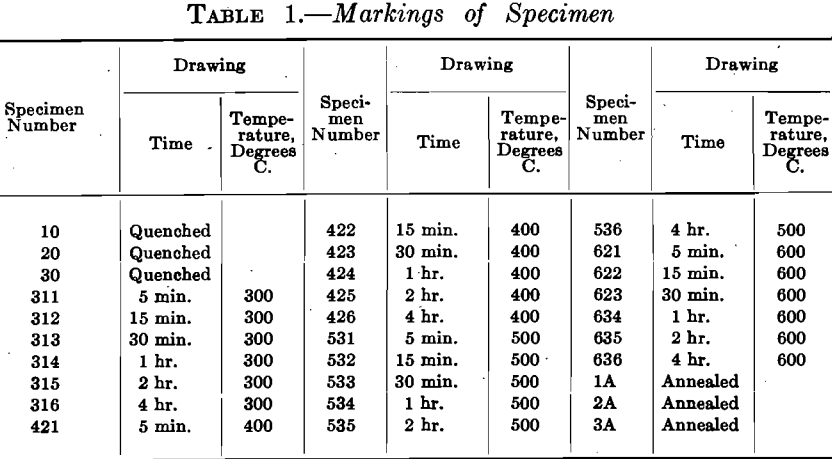
number indicates the time of reheating, 1=5 min., 2 = 15 min., 3 = 30 min., 4 = 1 hr., 5 = 2 hr., 6 = 4 hr. A complete list of the markings is given in Table 1.
After the heat treatment, a ½-in. (12.7 mm.) piece was sawed from the end of each specimen for microscopic examination and hardness tests and the remaining 5-in. (12.7 cm.) lengths were turned into standard threaded tensile-test specimens with 2-in. gage length and 0.505-in. diameter.
TENSILE AND HARDNESS TESTS
The machined and threaded specimens were first marked with the 2-in. gage mark and their diameters measured. They were then tested on a Tinius-Olsen autographic machine of 60,000 lb. (27,216 kg.) capacity
in the testing materials laboratory of the Massachusetts Institute of Technology. The autographic attachment was operated by the expansion of the specimen under the load and gave a plotted result of load elongation for the specimen.
From the curve, the yield point could be easily obtained, also the maximum and breaking loads. The use of the autographic attachment was especially valuable in the case of the high-carbon specimens as the determination of the yield point by the drop of the beam is liable to considerable error. Slow speed was used on the tests and when the specimens had been broken, they were measured for elongation and for decrease in diameter.
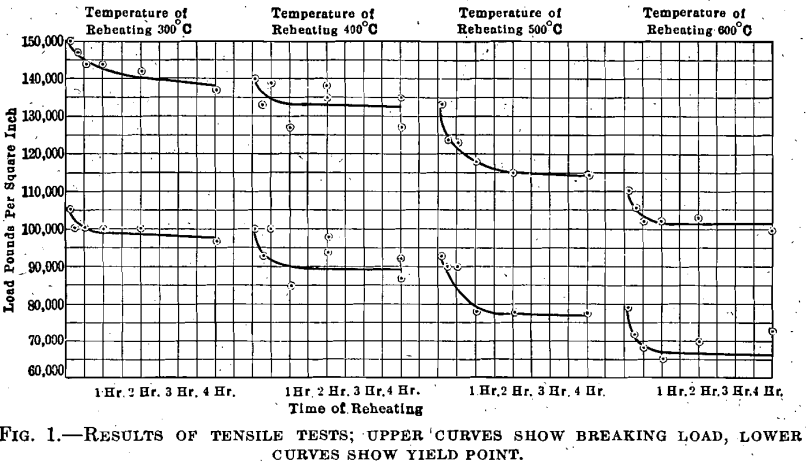
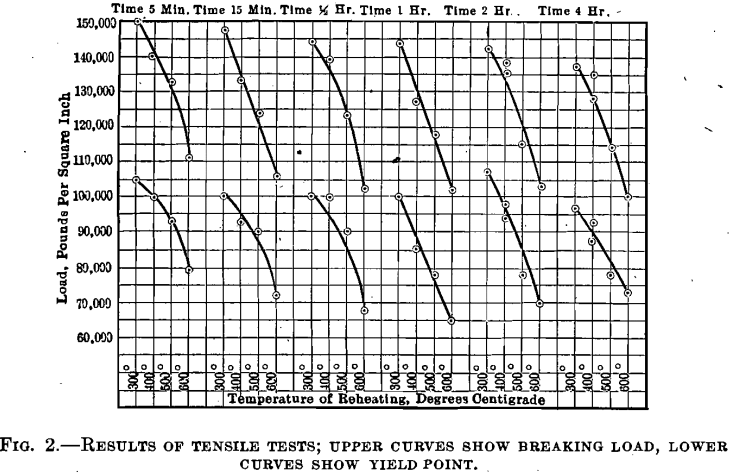
The average figures for yield point and maximum load are plotted in Figs. 1 and 2. It should be noted that, in several instances, a figure that obviously was faulty was not included in the average.
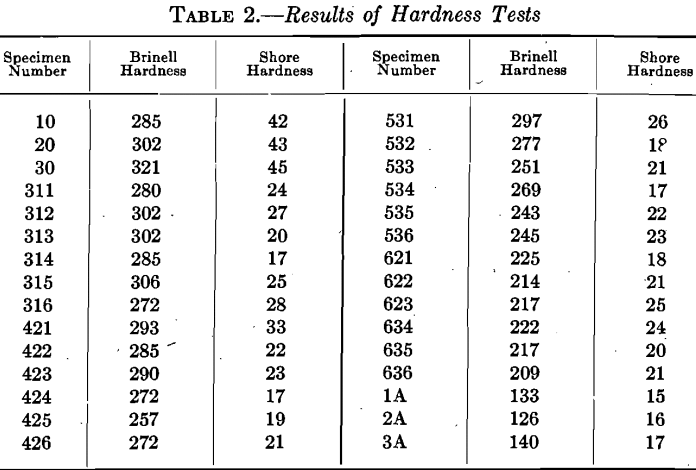
Microscopic examination of the pieces sawed from the ends of the specimens showed the usual structures. The photographs are not included in this paper. The pieces used for microscopic examination were used for hardness tests with an alpha Brinell Machine and the Shore Scleroscope. The results are given in Table 2.
DISCUSSION OF RESULTS
In spite of the fact that great care was taken to secure uniform treatment of the three specimens in each set, some sets show erratic results. In four cases, the results were obviously low so the figures were rejected. In all other cases the average of the three results was plotted in the curves. The following points may be properly emphasized.
- Even 5 min. heating of the quenched steel at 300° C. lowers considerably the strength and hardness and increases the ductility.
- There is a marked increase in ductility in passing from the 400° to the 500° treatment without an equivalent lowering of strength; it is accompanied, however, by a change from an indefinite to a definite yield point. This was clear on the original load-elongation curves, which are not reproduced here. Although the annealed specimens from the three bars showed the same yield point and ultimate strength, there was a difference in the ductility; this explains drop in ductility between the ½ hr. and 1 hr. treatment at 600° when the bar changed from No. 2 to No. 3.
- The specimens reheated to 600° C. are nearly as ductile as the annealed specimens, but they have an elastic limit about 60 per cent, greater.
- In spite of several irregularities in the curves, it is evident that reheating the steel for 1 hr. is all that is necessary and there are indications that for temperatures of 400° and below, ½ hr. is sufficient. This confirms the work of Hayward and Raymond and also bears out the statement of Goerens that “the influence of time becomes more decided as the temperature of annealing increases. It is clearly indicated that each particular temperature of annealing corresponds to a definite tenacity and elongation which is practically independent of the annealing period when once the duration of the annealing has lasted from a few minutes to about an hour according to the height of the temperature.”
