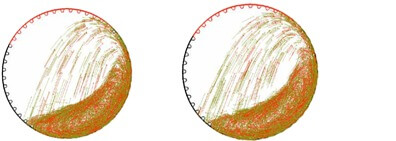
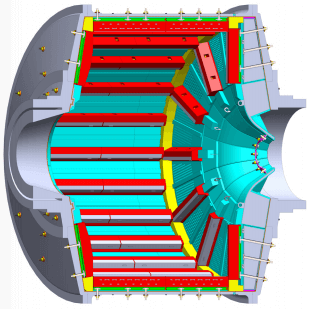
 To a more significant degree than in other comminution devices, SAG Mill Liner Design and Configuration can have a substantial effect mill performance. In general terms, lifter spacing and angle, grate open area and aperture size, and pulp lifter design and capacity must be considered. Each of these topics has had a considerable amount of research, and numerous case studies of evolutionary liner design have been published. Based on experience, mill-liner designs have moved toward more open-shell lifter spacing, increased pulp lifter volumetric capacity, and a grate design to facilitate maximizing both pebble-crushing circuit utilization and SAG mill capacity. As a guideline, mill throughput is maximized with shell lifters between ratios of 2.5:1 and 5.0:1. This ratio range is stated without reference to face angle; in general terms, and at equivalent spacing-to-height ratios, lifters with greater face-angle relief will have less packing problems when new. but experience higher wear rates than those with a steeper face angle. Pulp-lifter design can be a significant consideration for SAG mills, particularly for large mills. As mill sizes increases, the required volumetric capacity of the pulp lifters grows proportionally to mill volume. Since AG/SAG mill volume is roughly proportional to the mill radius cubed (at typical mill lengths) while the available cross-sectional area grows only as the radius squared, pulp lifters must become more efficient at transferring slurry in larger mills. Mills with pebble-crushing circuits will require grates with larger apertures to feed the circuit.
No discussion of SAG milling would be complete without mention of relining. Unlike a concentrator with multiple grinding lines, conducting SAG mill maintenance shuts down an entire concentrator, so there is a tremendous focus on minimizing required maintenance time; the reline timeline often represents the critical path of a shutdown (but typically does not dominate a shutdown in terms of total maintenance effort).
SAG Mill Reline times are a function of the number of pieces to be changed and the time required per piece. Advances in casting and development of progressively larger lining machines have allowed larger and larger individual liner pieces.
While improvements in this area will continue, the physical size limit of the feed trunnion and the ability to maneuver parts arc increasingly limiting factors, particularly in large mills. The other portion of the equation for reline times is time per piece, and performance in this area is a function of planning, training/skill level, and equipment.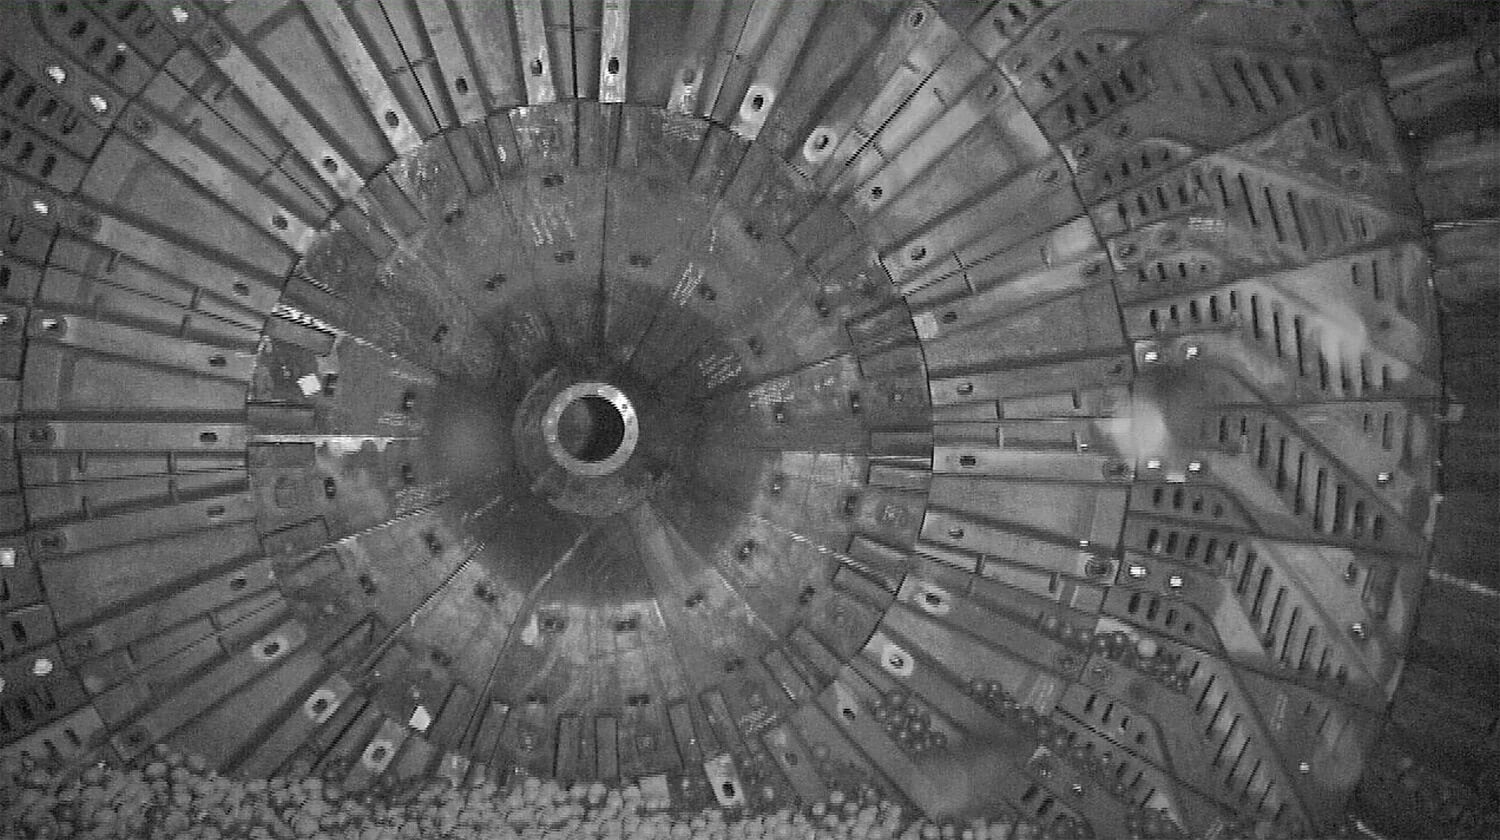
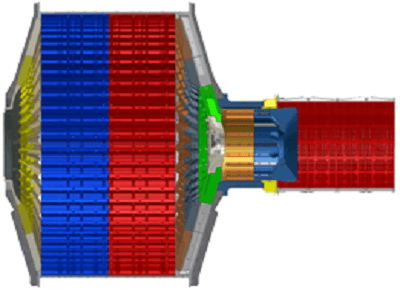
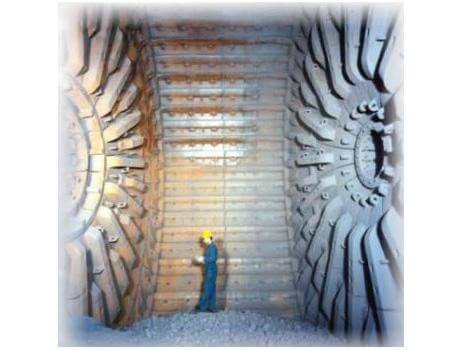
Mill Internals
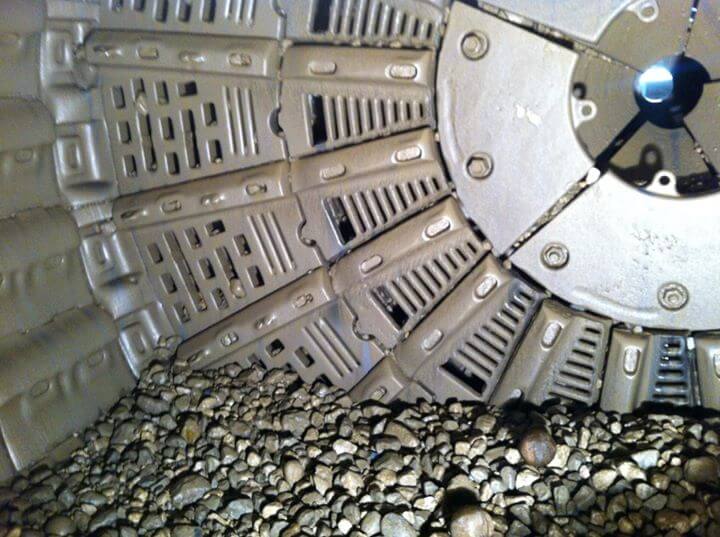
As with rod and ball mills liner designs for autogenous and semi-autogenous mills have been in a state of flux for a number of years. Operators continually search for optimum designs. Each mill application and each liner material coupled with varying mill diameters will produce a different internal wear pattern. In addition lifter spacing and lifter height will have an effect on mill performance and liner wear rate.
On fully autogenous mills featuring reversible rotation significant success has been achieved by the use of Ni-hard wear plates with replaceable “clamp type” lifters of chrome-molybdenum steel, or one of the “tough” iron alloys. Ni-hard can be used as liner plates in fully autogenous operations because there’s no point impact action of 4 to 5″ diameter steel balls as in semi-autogenous grinding.
Lifter spacing around the shell periphery has generally been satisfactory with the number of lifters at twice the inside shell diameter in feet. For example, on a 28′ diameter mill there would be 56 lifters per circle. It has been found that these lifters provide a definite aid in the autogenous grinding action. When wearing occurs, grinding efficiency drops.
In contrast, it has been found that radial lifters on the ends are required only to protect the Ni-hard wear plates from abrasion and to extend their life. These lifters have been spaced at the frequency of one per foot of diameter; for example, again on a 28′ diameter mill, there would be 28 equally spaced radial rows of lifters on each end.
In fully autogenous or semi-autogenous grinding the design of the discharge arrangement is all-important to successful mill operation. This applies to either diaphragm or peripheral discharge.
If the discharge diaphragm does not have a large enough capacity the mill will display all the outward appearances of being too small (or a given capacity. The charge and slurry level will rise, the grind will get coarser, and slurry will leak from the feed chute seals.
In analyzing the diaphragm assembly capacity, grate slot area is important. Perhaps more important is the load carrying capacity of the dischargers or “pans” behind the grates. If these pans do not have sufficient capacity the classical “solution” of additional grate area will not always improve the situation. If may in fact make it worse by allowing slurry “to spill back” to the mill thereby causing the mill to run “too wot”, allowing the charge to “float”, reducing the grinding efficiency. In addition, the abnormal internal wear in the diaphragm assembly due to spill-back is also detrimental.
In many cases, depending on the circuit, ports allow the discharge of pebbles or worn balls. In cases such as autogenous mills at the Empire Mine, all the pulp discharges through ports, approximately 3″ square, with no slots in the “grates.”
It is important that autogenous mills have a “low level” discharge in order for the grinding charge to run as “dry” as possible. This promotes a good lifting action In the mill and an effective rock grinding action.
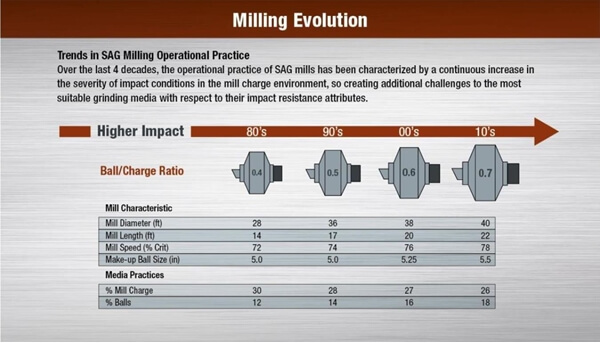
In semi-autogenous grinding, especially in non-ferrous ore milling where most of the experience exists, there is a trend toward maximizing the size and weight of wearing internals. In some cases liners and lifters have been combined into an integral casting in order to facilitate fast change-out and maximize the availability of the mill. This trend occurs at the obvious expense of minimizing wear rates and scrap loss.
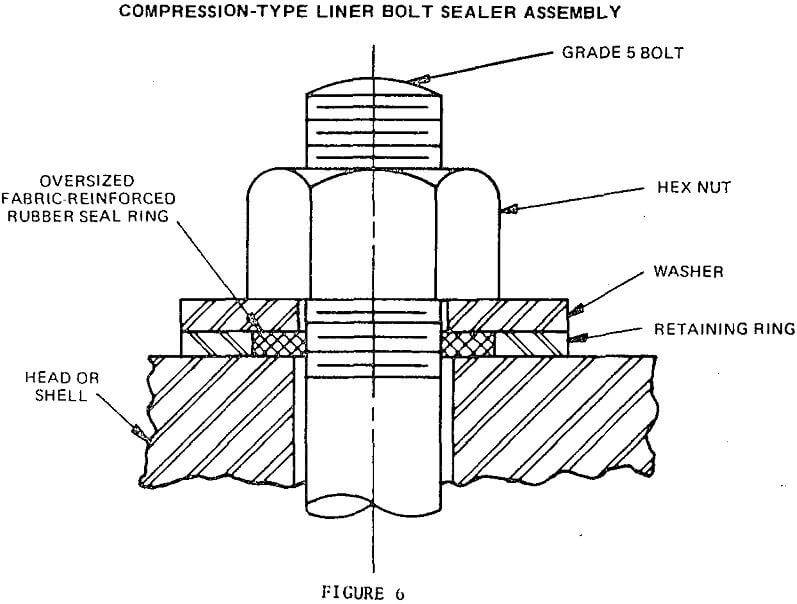
Liner bolts have ranged from 1.5″ to 2.0″ diameter. Grade 5 (high strength) bolts are used. In order to use the fully capability of such a bolt, a sealer-washer-nul assembly as shown in Figure 6 is recommended.
Grinding Mill Shell Design
The design incorporates a circumferential transition plate welded in place between the end of the shell cylinder and the shell flange. The transition plate dimensions are a result of a stress analysis program for minimizing shell stresses, while optimizing material usage.
It is applicable whether the shell flange is turned inward or outward and whether the shell flange is normal to the cylinder or inclined. The concept is particularly important in the design of large grinding mills of all types.
Three-piece “compression-type” liner bolt sealer is designed to prevent leakage of slurry or dust from mill liner bolt holes. Used in conjunction with Grade 5 (high-strength) bolts, this assembly is generally applied to rod mills over 10.0′ in diameter and ball and autogenous mills greater than 13.5″ in diameter. Metal to-metal contact (nut washer retaining ring mill) compresses the seal ring and allows full proof load of liner bolt to be utilized, keeping liners tight, in large diameter, high impact mills.
Semi-Autogenous Mill Liners Designs Alloys and Maintenance Procedures
Successful (or unsuccessful) liner design begins with the original equipment manufacturer. It is vital for the long term success of an operation that design constraints in machines, plants, and circuits be minimized.
Once the process metallurgist has thoroughly tested the ore body and determined the optimum method of mineral recovery; and the plant designer has efficiently and economically laid out the circuit, instrumentation, equipment installation, and building design; and the mill manufacturer has completed his stress analysis and reliability engineering for mill design, the most significant remaining factors that can affect bottom line operational results such as:
- Annual production.
- Consumables (liner and media) and
- Cost per tonne.
Good Mill Liner Alloys And Design Installation and Prudent Operational Practices
Prior to finalization of mill design the owner/operator or his appointee should meet with the mill designer/vendor, contracting/plant design engineer and foundry source to thoroughly review and consider such key factors (1) as:
- The milling application (See Table I).
- Bolt hole spacing (axial). Some mill vendors provide 305 mm (12 in.) spacing, and this provides good flexibility for original and future design work.
- Bolt hole spacing (circular). The chord produced by spacing equal to two times mill diameter (ft.) or 470 mm (18.8 in.) is desirable. Shell liners so designed can minimize charge “packing” problems and still provide sufficient lifts for normal mill action to lift the charge and hence draw power and do work (comminution).
- Mill end plate bolt spacing. Angular spacing equal to 360° divided by the mill diameter (ft.) will provide casting design flexibility and assist in optimizing future performance. Radial bolt holes thus provided should be generous in number and spaced at about 460 mm (18 in.).
- Sufficiently “stout” mill mechanical design such that liner section thickness is not unreasonably restricted for future modifications.
- Bolt size. A 38 mm (1.5 in.) Grade 5, or Grade 8 (high strength) bolt is sufficient to fasten liners provided the spacing recommended above is followed.
- Extra liner holes not used to fasten liners can be used as “knockout holes” for worn liner removal.
- Mill reversibility for reduced liner scrap loss and balanced wear. Some fully autogenous mill operators have found that this feature reduces liner consumption by approximately ten percent (10%) compared with undirectionally rotated mills.
- Variable speeds for the mill to prevent throwing balls against exposed liners at reduced ore volume load.
- Trunnion openings large enough to accommodate large liners.
Other layout/circuit issues that should be settled prior to mill final design and purchase are:
- Adequately sized liner handler to allow maximum liner size and weight to reduce total liner pieces and speed change time. Plant layout must allow efficient, portable use of these machines from mill to mill. Liner castings must have a safe, compatible lifting means, e.g., a cast integral lifting eye or special bolt hole to allow best liner handler utilization.
- Capability for inching a full mill so that operators do not have to “grind-out” prior to mill inspections and liner replacements.
- Provide excess pumping capacity to compensate when ore is “soft”. This can be provided in terms of oversize or variable speed pumps. Consideration should be given to flexible piping, valving, and classifier arrangements to allow multiple secondary mills to be switched in and out of the circuit depending on ore hardness.
- Provide excess flotation capacity to eliminate a process “bottleneck” which again affects mill loading and possible liner breakage.
- Analyze ball trajectories so that mill speeds can be chosen to avoid “destructive contact between balls and exposed shell liners”.
- Interlock mill drive motor(s) with new ore feed supply so that mill, especially a semi-autogenous mill, does not run “starved” for feed. This will reduce occasions for damage to mill liner by severe ball-on-liner-contact.
Liner designs and alloy choices for original new mill installations are unfortunately often cost-constrained because they must be capitalized for accounting purposes. It is an unusual case when new mill liner designs are aimed at increasing machine availability and reducing cost per ton. This is regrettable because many operators acknowledge that just a 1% increase in availability will result in an approximate 3% increase in total annual tonnage! This is so because the total down-time to shut down, start up and re-balance the circuit is generally the same for each liner maintenance shutdown. If the number of those shutdowns are reduced, the tonnage lost during all the preliminaries and start-up balancing is reduced also, thus increasing annual tonnage.
General Liner Design Principles
Whether the mill is to be fully autogenous (F.A.G.) or semi-autogenous (S.A.G.), there are some basic design concepts to remember.
Abrasive slurry racing or “washing” on the mill shell cylinder and ends must not be allowed. Catastrophic damage to structural elements can result. Techniques such as:
a. Staggered liner joints,
b. Slashed or “raked” ends,
c. Anti-racing “interrupts”,
d. Suitable end/shell liner gap filler material,
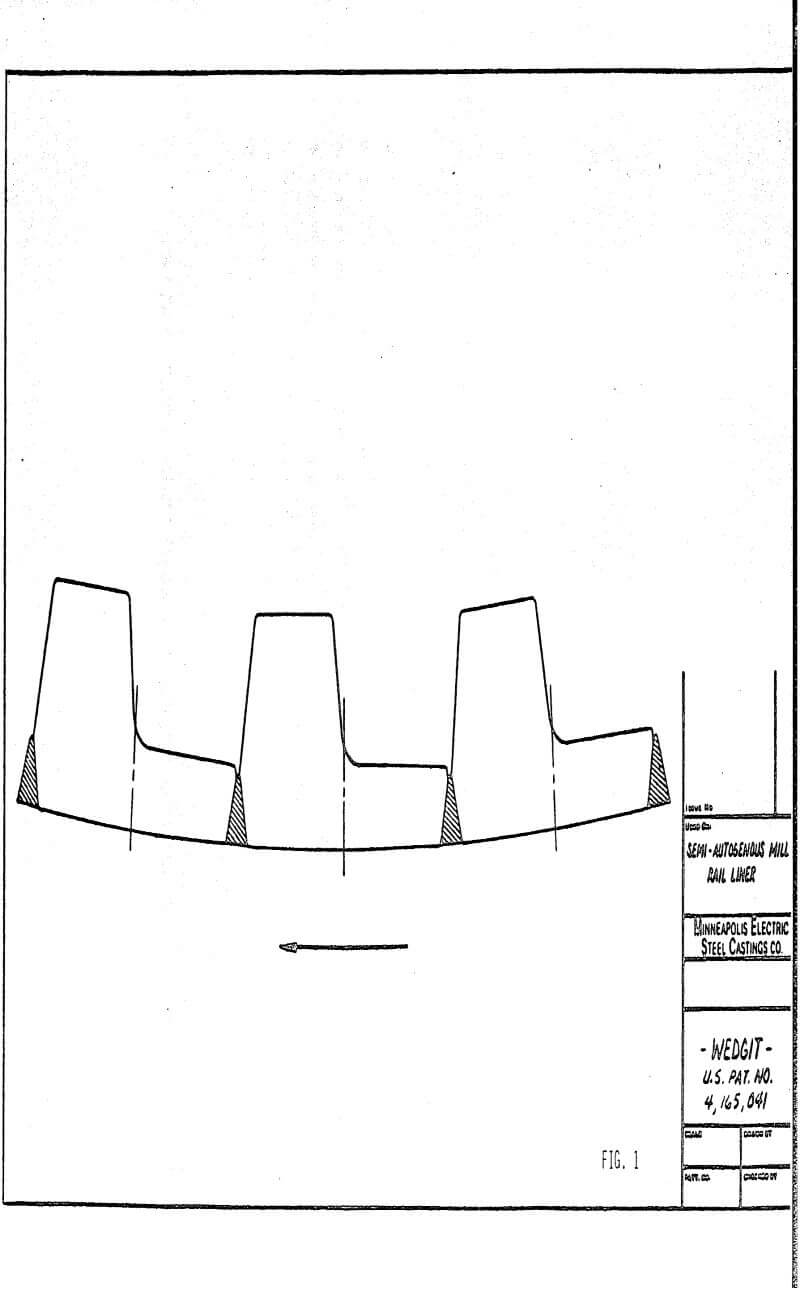
e. M-E patented Wedgit feature. (See Figure 1)
can all be appropriately used.
True oval or “lune” head bolts should be used as opposed to square head or “square oval” type in order to reduce stresses in bolt hole corners.
Ideal Liner Design
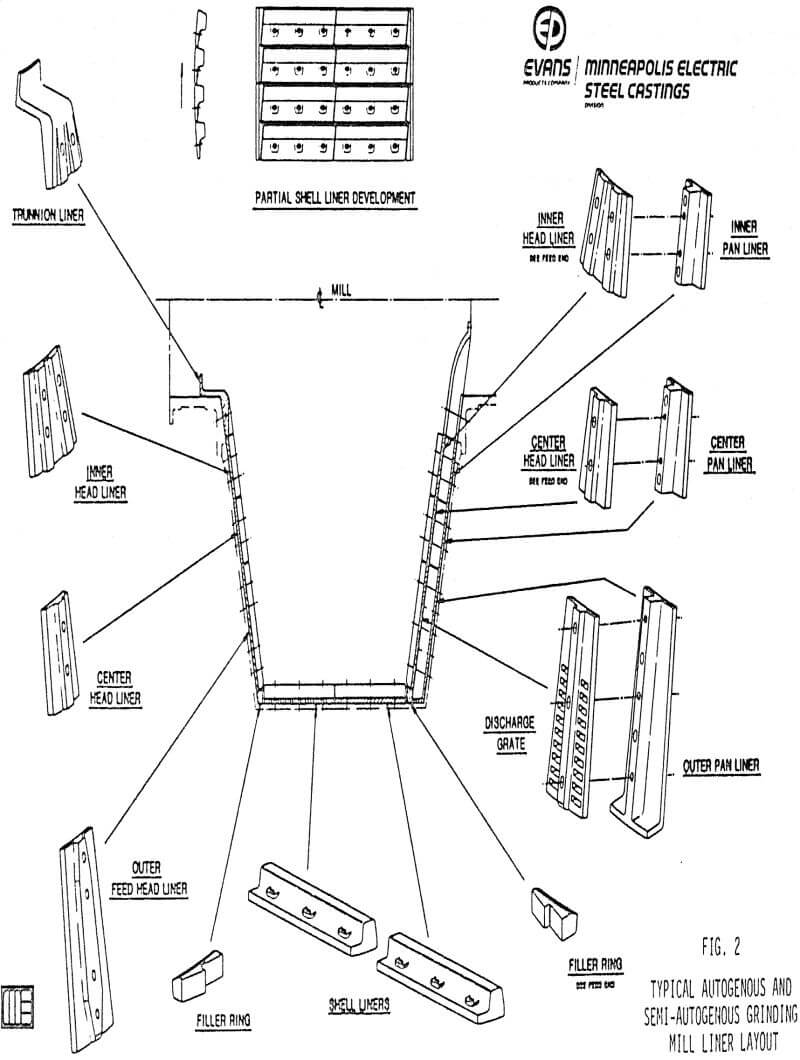
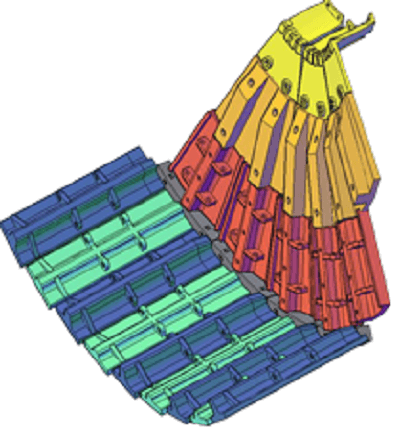
Figure 2 illustrates an idealized S.A.G. or F.A.G. mill liner design showing what is possible to minimize patterns and number of different active liners. Note that the inner and center cone liners and filler rings are identical on both feed and discharge ends.
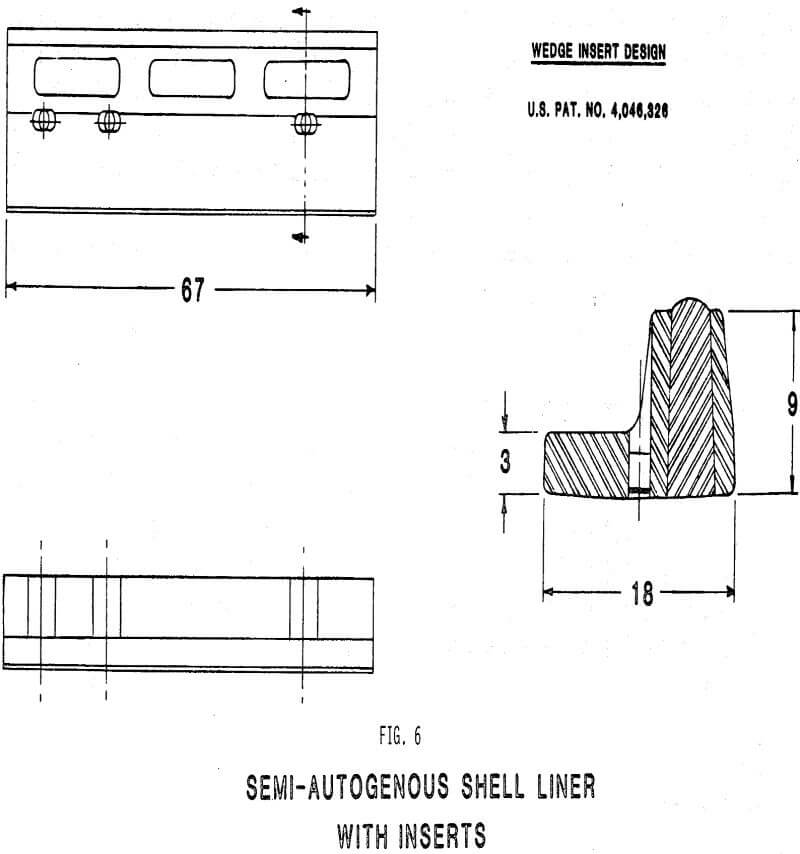
The “Z”-shaped or slashed end filler ring allows the shell liners to be interchangeable from end to end. The use of the integral lift bar principle reduces the number of pieces and handling time. This design is also convertible in the future to the patented “insert” concept as applicable. See Figure 6.
Total active patterns in this idealized case is only six excluding the trunnion liner and inner discharger.
Semi-Autogenous Grinding (SAG) Mills
The shell liner profile possible is primarily determined by the chordal dimension. The profile must minimize packing and plate wear but give sufficient lift for proper grinding action. Liner profiles are as numerous as operations. They range from typical plate and lifters to “rail” or integral liners. Typical head liner design features heavy integral radial ribs to protect the wear plate.
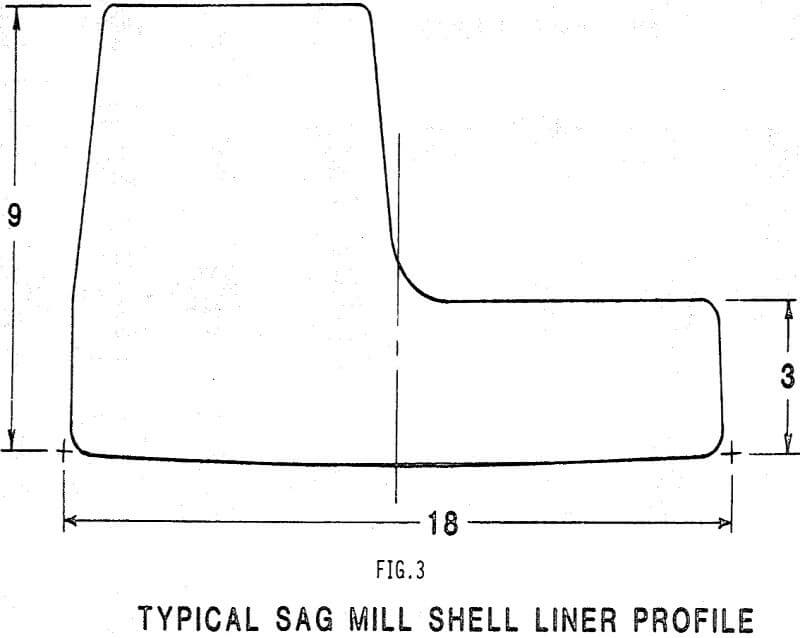
The one-piece design is very common in the industry because of the reduction in the number of pieces. Fewer pieces need to be replaced, hence mill availability increases. For example, a plate and lifter assembly with 864 pieces on the shell was reduced to 288 pieces in the one-piece design or 1/3 of the original. See Figure 3. Higher availability is worth more than slight scrap loss reduction.
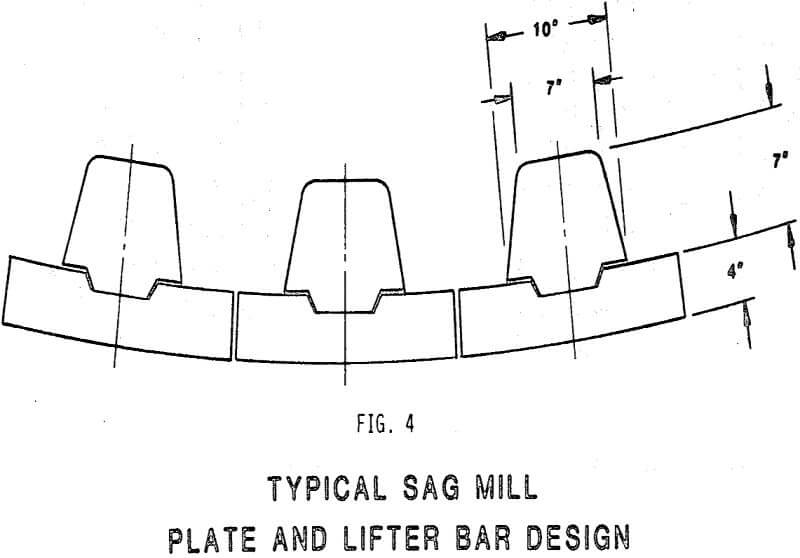
If a lifter—plate assembly is used, the “non—wedging” design is favored. This design “clamps” the plate for a better seat and provides no possibility of a wedge or “hoop” effect. See Figure 4.
The shell liner lift is usually 125-175 mm (5-7 in.) over a 63-75 mm (2.5-3 in.) plate. This amount of lift gives adequate cascade action, good charge, lift and minimal scrap loss. Excessive lift can cause liner damage by impacting balls on the unprotected shell liners. Once lift is lost, slippage occurs with a resultant drop in throughput and increased unit power consumption. An appropriate liner change-out sequence must be chosen to take into account throughput, power and scrap.
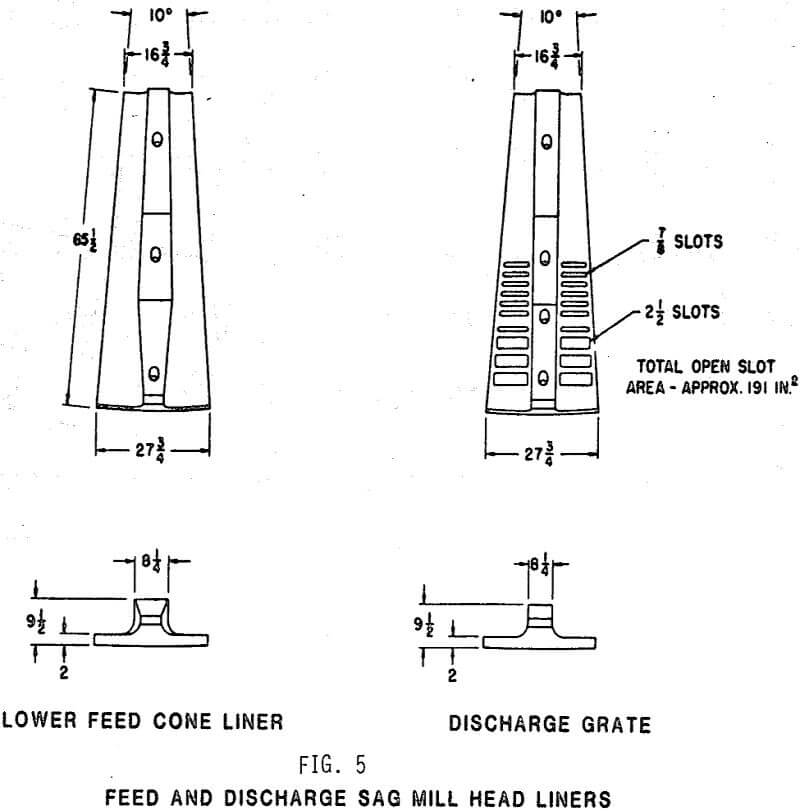
The lift on the head liners probably does not significantly contribute to the grinding action, but does significantly extend the life of the head plate. Lift width is up to two times that on the shell and/or greater height. See Figure 5. Because of wider chordal spacing than on the shell cylinder, these lifts should all be full height (not high-low) in order to protect plate area and maximize liner life. Increased lift height rather than width adds more life.
“High-Low” Liner Systems
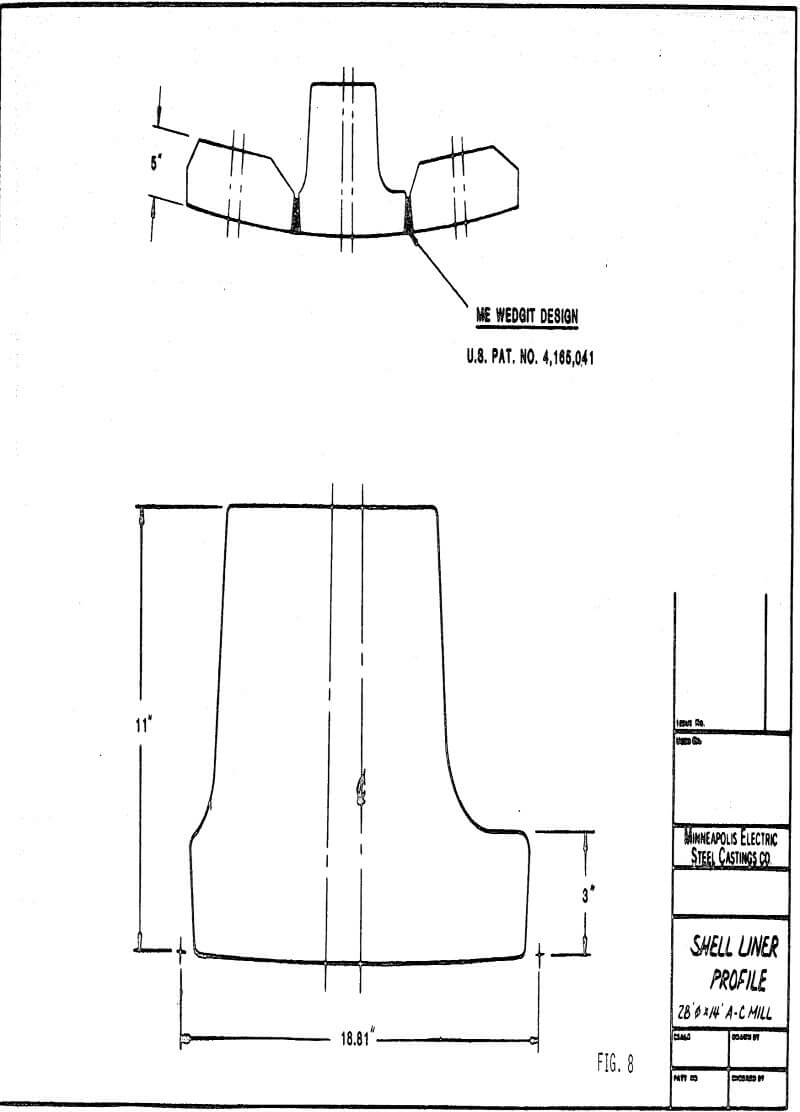
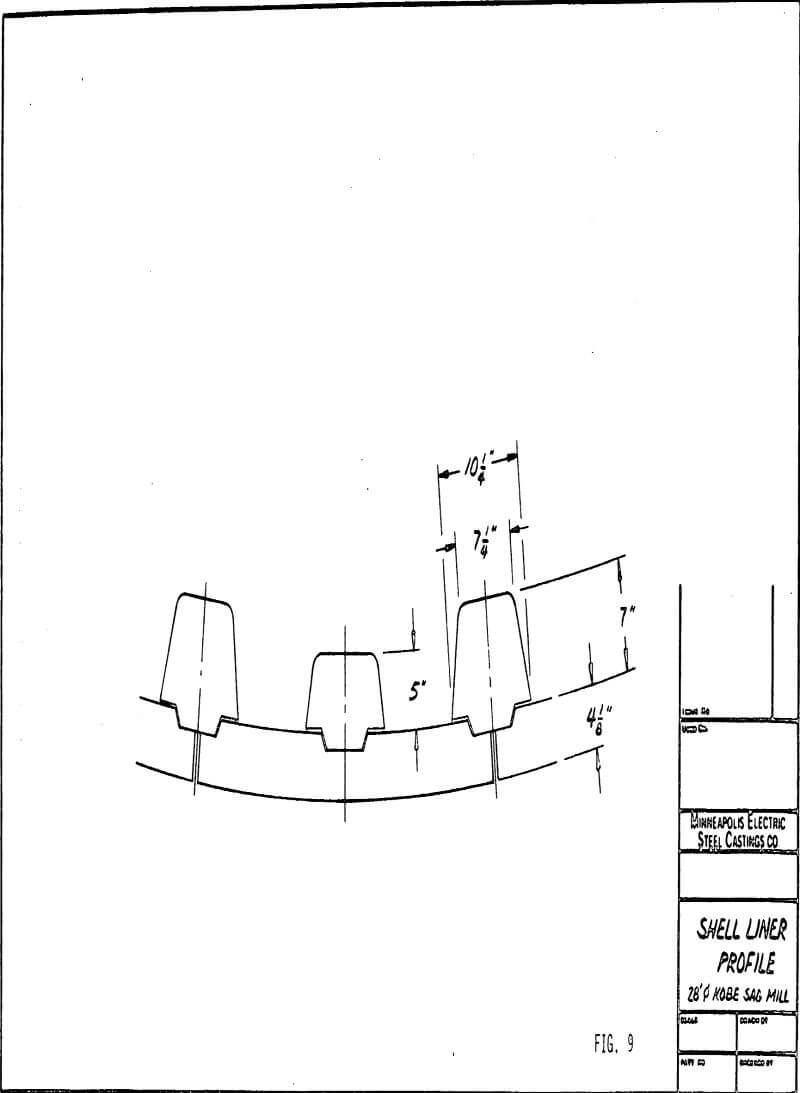
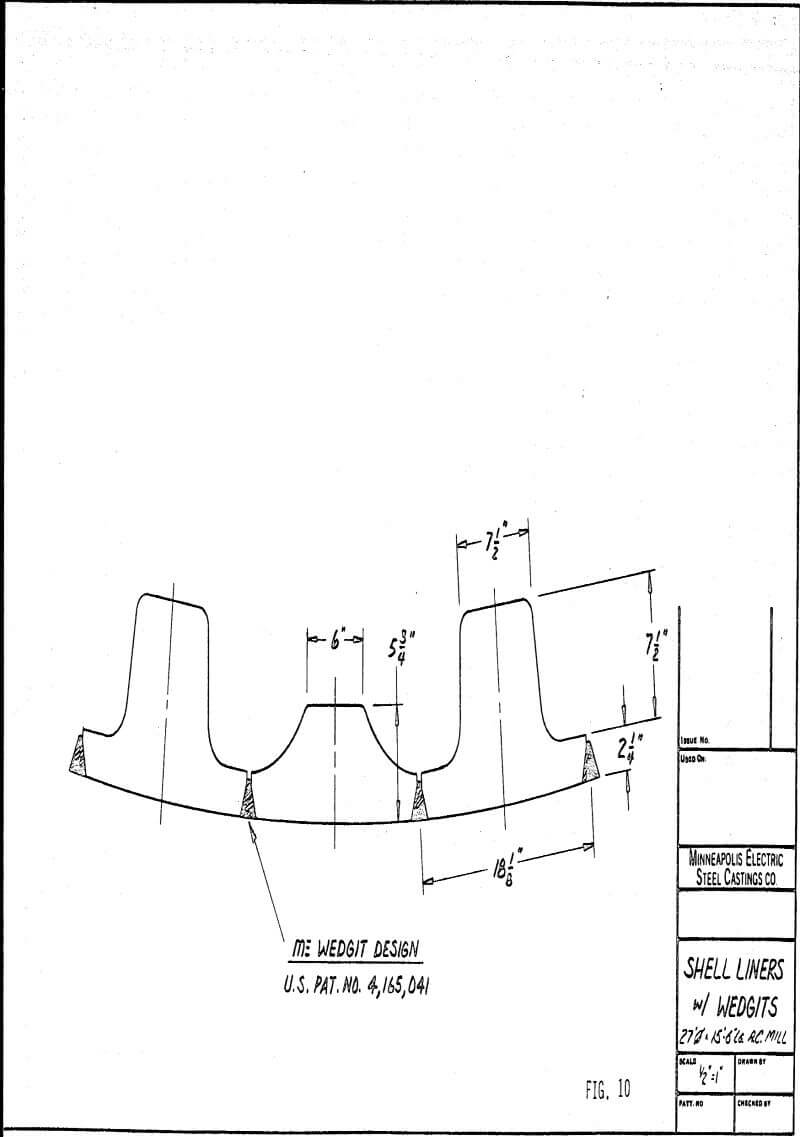
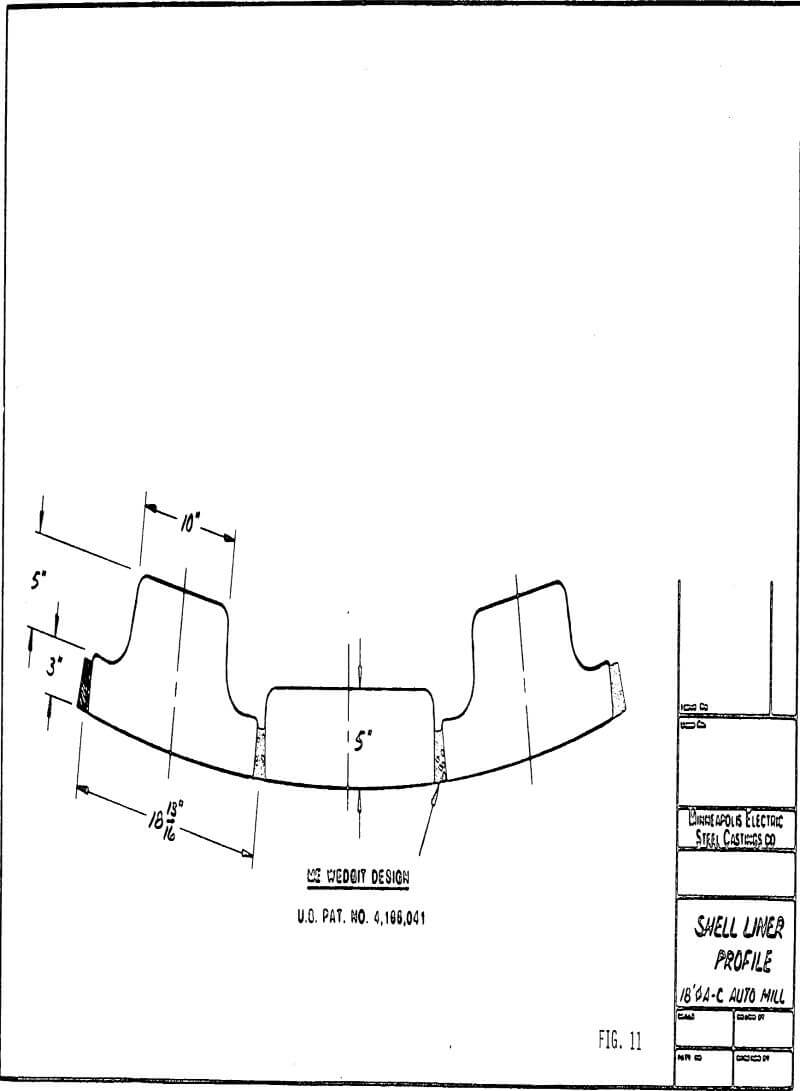
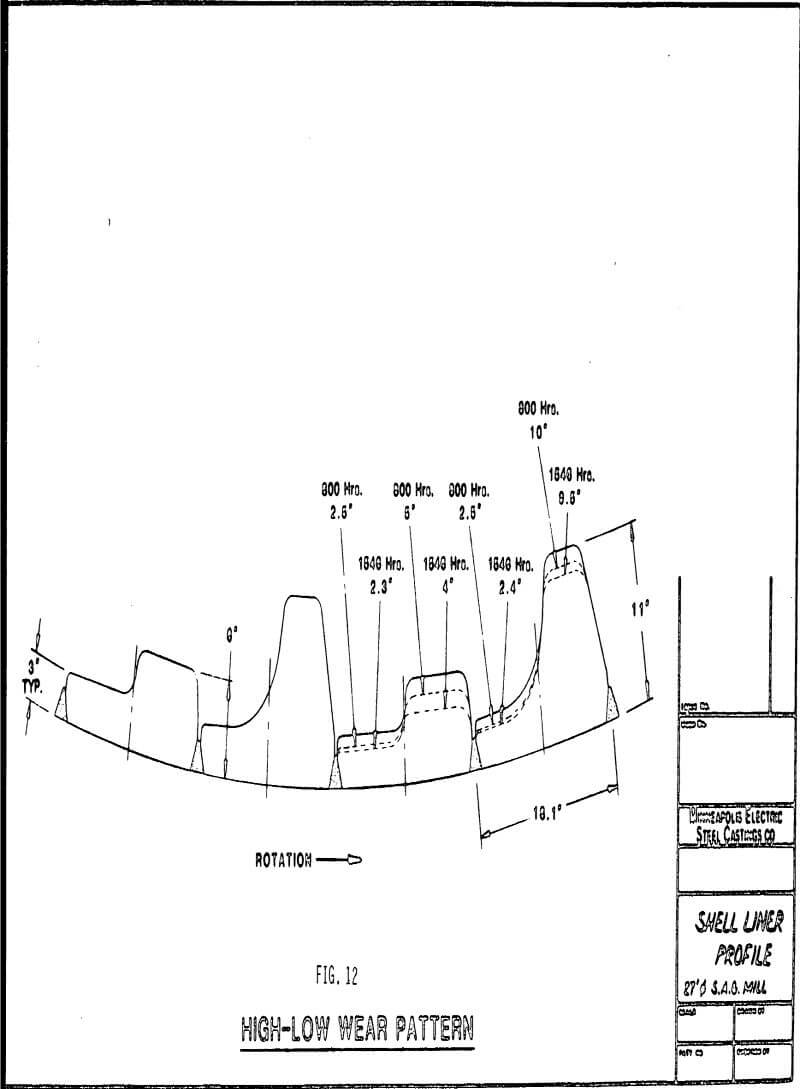
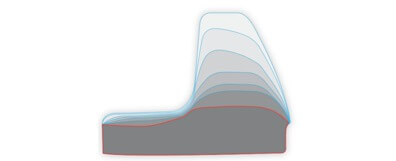
The concept of a “patterned replacement” or high-low method of shell liner operation has lately become popular in both autogenous and semi-autogenous milling. Here, either two alternating heights of liners are started initially (a “high” and a “low”) or a single high set is allowed to wear half way, and then every other axial liner row is replaced by new “highs.” As the “lows” wear out they are replaced by new “highs”, etc. See Figures 8 through 11.
This approach effectively doubles the spacing between two high lifts. In cases where the ore slurry tends to pack between closely spaced high lifts, the high-low system often alleviates this condition.
The actual wear pattern on a set of liners currently operating on an iron ore is shown in Figure 12.
In order to make this approach successful, it is critical that the low liners or lifters be quickly removeable. This is sometimes difficult if the gaps between liners are tightly packed with ore and ball chips. The use of the patented “Wedgit” design concept, with integral liners in particular, makes this task a much easier one.
Because the high-low liners are never all new or all worn, mill capacity tends to be more uniform. Mill tonnage does not display the up and down variations experienced when using conventional replacement techniques. Experience to date on mills ranging from 5.5 m (18 ft.) diameter to 11.0 m (36 ft.) diameter shows that capacity is equal or greater than with conventional lining at the same unit power consumption.
Fully Autogenous Grinding (FAG) Mills
End and shell liner design in these mills is much the same as for SAG mills. The effect of liner design on performance is equally as important. For instance, in an iron ore operation using 6.4 m (21 ft.) mills, mill throughput was increased by 15 percent and power consumption reduced by 13 percent by liner redesign alone.
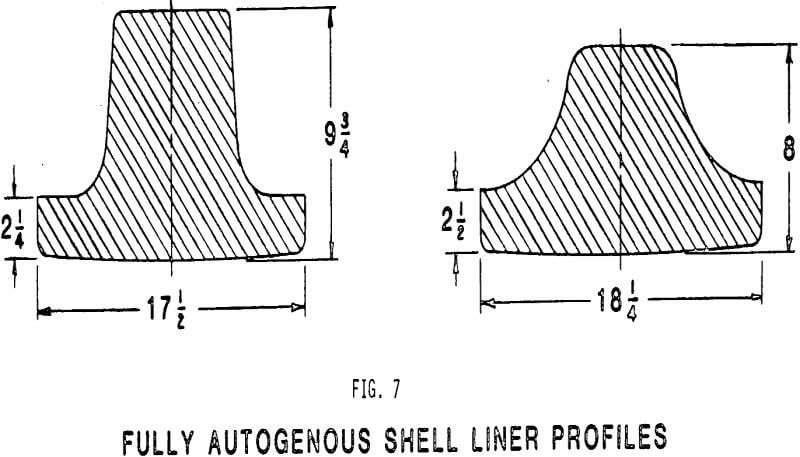
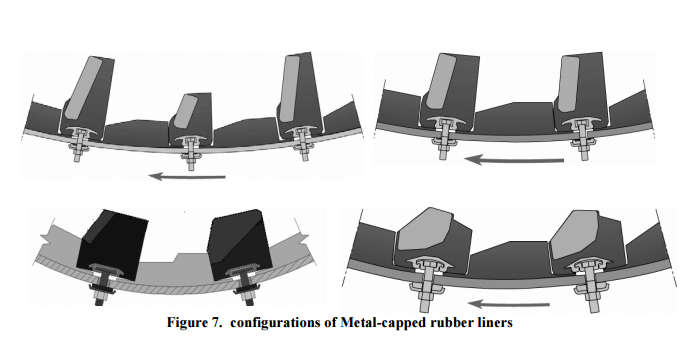
Generally in FAG mills more cascade action is desired, so lift is increased by 25-50 mm (1-2 in.). Plate thickness can be reduced because of lack of point impacts of large balls. Typical profiles are given in Figure 7.
Discharge End Designs
Historically the grate discharge has been a design option in grinding mills. With the introduction of wet autogenous and semi-autogenous mills, this type design is used exclusively.
The discharge end of this mill must incorporate some method of conveying the pulp to the outside of the mill. This pulp lifter or pan liner must be covered and protected from the grinding action and a means (the grate) of passing the pulp into the pulp lifter must be provided (see Figures 2 and 5).
To further complicate the problem, larger diameter mills are often designed to be operated either unidirectionally or bi-directionally.
The mill designer should be responsible for design (or at least to specify the design) parameters of the discharge end such as:
- Grate open area.
- Slot size.
- Depth and quantity of pan lifter or discharge vanes.
If the discharge diaphragm does not have a large enough “pumping” capacity, the mill will display all the outward appearances of being too small for a given capacity. The charge and slurry level will rise, the grind will get coarser, and slurry will leak from the feed chute seals.
In analyzing the diaphragm assembly capacity, grate slot area is important. Perhaps even more important is the load carrying capacity of the dischargers or “pans” behind the grates. If these pans do not have sufficient capacity the classical “solution” of adding additional grate area or increasing the slot size will not always improve the situation. It may in fact make it worse by allowing slurry “to spill back” into the mill thereby causing the mill to run “too wet”, allowing the charge to tend to “float”, and thus further reduce the grinding efficiency. Abnormal internal wear in the diaphragm assembly due to spill-back can often identify this condition.
In many cases, depending on the circuit, ports allow the discharge of pebbles or worn balls. In cases such as autogenous mills at the Tilden, Empire, and Cyprus Bagdad Mines, all pulp and pebbles discharge through ports, with no slots in the “grates”.
It is important that autogenous and semi-autogenous mills have a “low level” discharge in order for the grinding charge to run as “dry” as possible. This promotes a good charge lifting action in the mill and efficient milling conditions.
Discharge End Mechanical Considerations
In the feed end and the cylinder of the mill, the active liners are bolted directly to the end or shell. However, in the discharge end, the active liners must be bolted on top of the pan liners and may require the use of bolts up to 900 mm (36 in.) in length. In a reversible 9.7 m (32 ft.) mill using up to 8% charge of 100-125 mm (4-5 in.) balls it is easy to see how critical proper design becomes. There are mills currently operating in which 90 percent of the liner downtime is chargeable to discharge end problems including bolt breakage, liner shifting and shell hole enlarging!
The discharge assembly on either SAG or FAG must be stabilized to eliminate liner movement. This can be accomplished by bolting the pans separately to the head. If stability is not accomplished, bolt holes in the expensive shell structure of the mill will be permanently elongated requiring extensive repair and costly downtime.
Grate design should incorporate an integral radial lifter. This lift on a grate can increase the grate life by up to 50 percent. The slot opening size is determined by the lump size to be retained in the mill. Grate plugging is minimized by proper slot taper and alloy selection. See Figure 5.
A good discharge end design should meet the following criteria:
- The pan lifters should be bolted directly to the end of the mill with their own dedicated bolting system – not shared with active cover plates.
- The active grates and liners should be easily changeable. If long bolts are to be used they should be seated at the base of the pan lifters.
- The active grates and liners should be keyed to the pan lifters to minimize shifting.
- Large, single piece active grate/liners that can be changed rapidly should be used to minimize downtime. See Figure 2.
Design work using these principles done with the discharge end of a 9.7 m (32 ft.) diameter mill some ten years ago is still current and successful.
Since that time, the same basic design has been applied at other locations both as retrofit and new installations.
Within the last five years some operators have become aware of the fact that the pan liners are also a wear part and are using a trough-shaped, cast urethane,”drop-in” liner which protects the pan liner. The pan liner, then becomes a structura part of the mill and theoretically will never be changed. Even if the normal change period of the pan liner is 3-5 years it is an expensive task. It appears that this concept is sound. Tests currently under way show urethane to be sensitive to ore pebble or worn ball particle size. Particles over 25 mm (1 in.) results in high urethane wear generally.
Alloys for Cost-Effectiveness
As a brief summary, the materials used in mining wear applications are predominantly steels and irons. The carbon steels used run from plain carbon to high carbon tool steels,but 95% of the steels used are somewhere in the middle of these extremes. Manganese steels used have a range of properties and the types used range from 6 Mn to the- 20-25 Mn types. The majority of these steels are of the 12 Mn standard Hadfield grades. The irons used are of two chemistry groups – the- NiHard (Ni-Cr) and the chromium irons (with or without molybdenum).
All have been produced in commercial quantities for over twenty years, and some, notably the Hadfield’s austentic 12% Mn steel, have been used in the mining industry for over a century. Over the years, improvements in alloys have been achieved by cooperation among research organizations, foundries and mill operators. Research delineated the fundamental metallurgical characteristics; foundries developed production methods to exploit these characteristics in wear parts; and mill operators tested the final product. This pattern of development continues today as better alloys are sought for liners for the large mills of the 1980’s.
There are certain fundamental considerations when selecting an abrasion-resistant alloy. The minimum requirement is that the alloy has adequate toughness to avoid breakage in the intended application. Abrasion resistance and toughness tend to mutually exclusive properties, meaning that an alloy with excellent abrasion resistance may have too little impact resistance and therefore may not be a suitable choice. A corollary to the minimum toughness requirement is that the alloy has adequate strength to resist gross deformation. Because they have low yield strength, austenitic 12% Mn steels cannot be used for mill liners – they will undergo extensive plastic deformation (or “growth”) that can break bolts, put enormous stress on the mill shell, etc.
Hardness on the surface of the unworn liner is not necessarily a good indication of wear resistance; a better measure is hardness on the worn surface. The reason for this is that some alloys, notably austenitic Mn steels and austenitic Cr-Mo and Ni-Cr white irons, can work harden in service to higher hardness levels.
S.A.G. Mills
The use of fully hardened liquid-quenched and tempered martensitic steels makes it possible to vary the hardness level throughout the mill in a “composite” approach, e.g. ;. shell liners are usually 388-444 HB, but head liners are subjected to wear, and not as much impact, and these liners can have hardnesses of 400-500 HB. Grates will be 321-375 HB range.
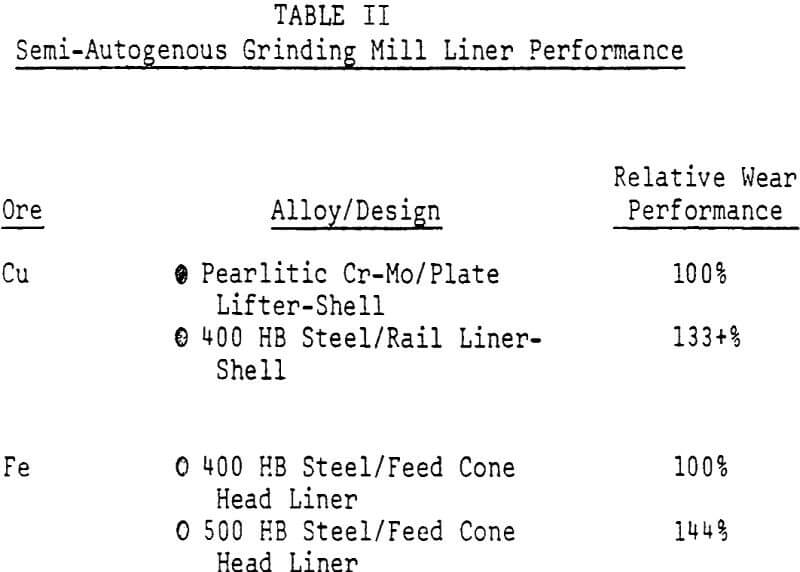
Table II gives a comparison of liner materials in semi-autogenous grinding of copper and iron ores. Shell liners in some large S.A.G. mills now last almost one year!
To achieve a balance between the requirements of good wear resistance and adequate toughness in shell and head liners, the M.E. patented “insert” concept was developed. See Figure 6. The softer, more impact-resistant holder protects the hard, wear-resistant insert providing better wear/ton than the one piece liner.
F.A.G. Mills
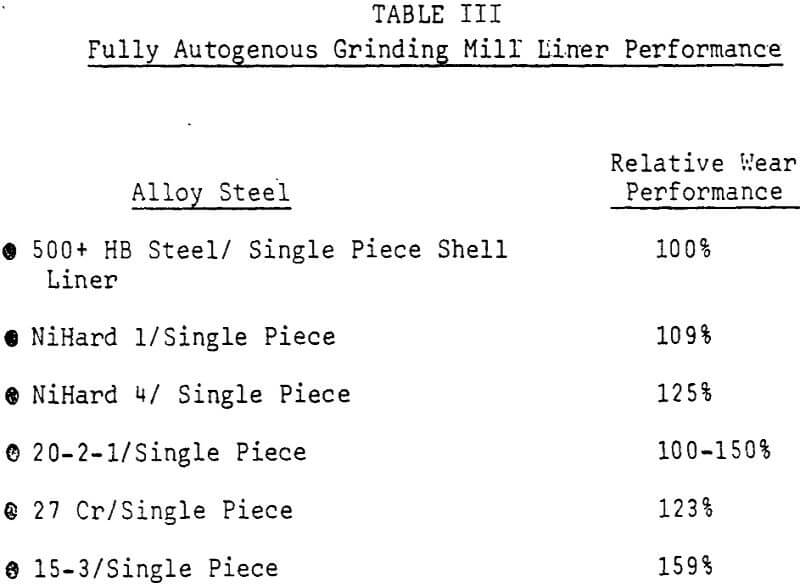
Because of the nature of the grinding media (large ore pieces) and lack of steel ball media, various white irons are used because of their high abrasion resistance and, if properly alloyed, good toughness. The results of materials tested against one another in a large fully autogenous mill are given in Table III. Note that fully hardened steel performed nearly as well as some irons tested.
Installation & Maintenance
These comments may seem obvious to some, however, recent actual cases bring home the need to reitterate these general installation guidelines:
- Do not torch-cut or weld heat-treated liners – cracking can occur. Have your foundry provide a suitable lifting means integral with the liner.
- Protect mill shell and ends from slurry wear by use of 6 mm (¼ in.) thick, cemented rubber liner backing of about 40 durometer.
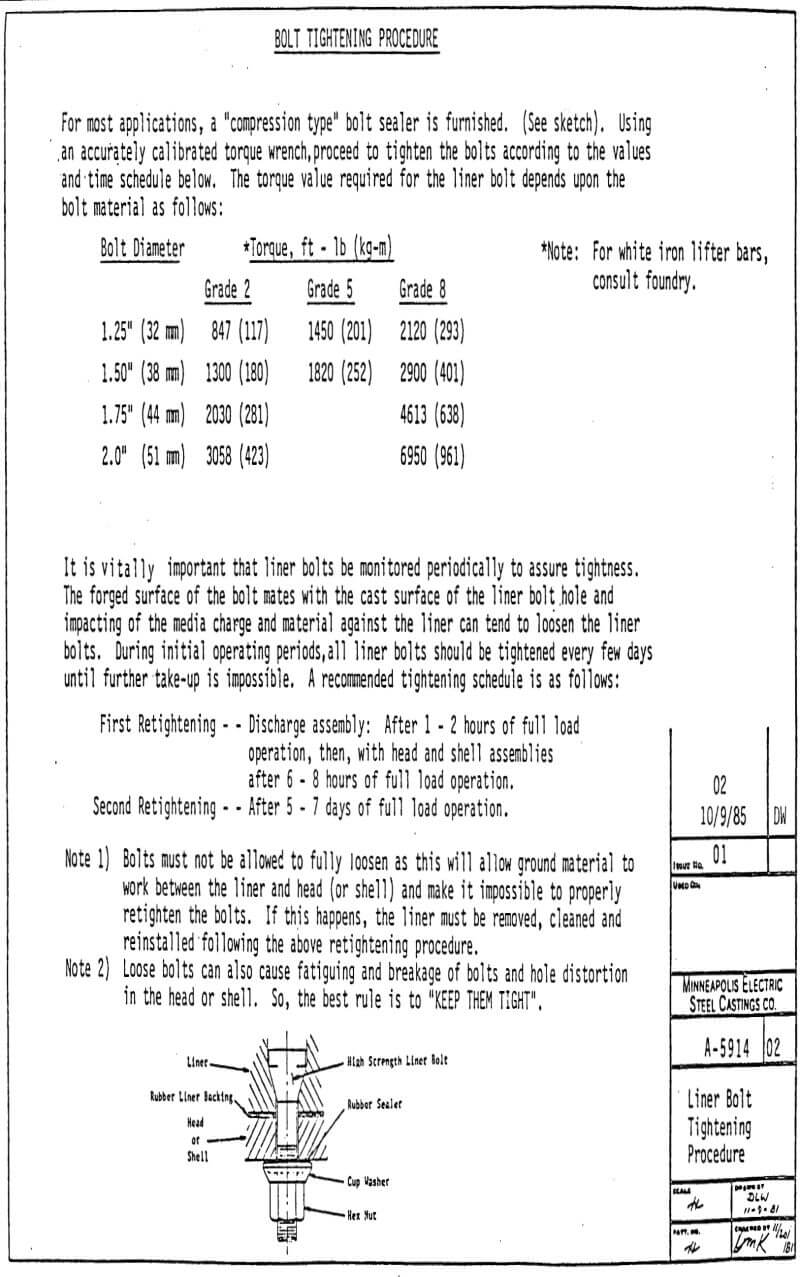
- Use proper strength (grade) bolts. Keep them tight and check periodically. See Drawing A-5914.
- If molten zinc is used to “set” or “back” the liners – be careful – consult mill supplier for proper procedure. Note: rubber backing cannot be used with zinc filler.
- Use a torque wrench on all liner bolts – 13 8 Kg-m (1,0 00 ft.-lb.) for irons – maximum, do not over-torque steels – specific torquing requirements depend on strength level of steel used and cross section of casting along with number of bolts per casting and bolt hole design.
- Avoid retorquing or reinstallation of liners when they have worn thin.
- Clean mill shell or head to insure proper fit of liner against shell or other mating liners to avoid bridging and possible excessive tensile stresses.
Without going into a detailed bolt-by-bolt liner installation/ change procedure the following comments covering “general set up” to start about a week ahead of the installation date may be helpful to someone organizing a first-time effort.
A. One week early: Bring liners inside building.
- Lay out liners on floor in order of use, for easy access with fork lift and liner hoist.
- Inspect lifting eyes – repair eyes or replace liners if necessary.
- Inspect and check liner bolt holes by inserting a bolt, head first, in each bolt hole.
- Make necessary lifting tools for each different type of liner to be handled.
a. Different lifting tools may be required for lifting liners from ground floor to conveyor and then from conveyor to position of installation.
b. Tool for liner removal is usually a rod or chain with a cross pin for use through a bolt hole.
c. Size lifting tools to safely handle the liner.
B. Bring bolts, nuts and washers to mill area.
1. Place bolts near liner conveyor so they can be easily passed into mill. If liner design permits, bolt may be put head first into bolt hole of liner and liner handled with bolt in it.
2. Place nuts and washers for easy access to liner work decks. This may mean hauling small buckets of each item by hand, if crane access is not available.
3. When bolt hole is to be left blank, have plugs on hand.
C. Set up feed chute and liner handling equipment for fast, easy movement.
- Considerable time can be saved with fast mill opening and liner handler set up. Tools required to speed up this job i.e., jacks, hoists, dollies, monorail, tugger, etc., pay for themselves quickly in improved mill availability.
- Either place feed chute on a permanent dolly for easy rolling or;
- Hang feed chute from a monorail so it can be lifted and rolled out of the way. The liner handler, if also hung on a monorail, allows quick and easy positioning.
D. Ready tools like impact hammer, air wrenches, brushes, scrapers, pry bars, sledge hammer, lifting tools, air arc, cutting torch, and welders.
Suspend impact hammer and air wrench with a chain hoist from a trolley on an overhead “I beam” where possible. Tools can then be moved to the different bolting or knock-out positions and then be easily moved out of the way.
E. Position portable inching drive. Check operation in both directions. Make sure all sheaves, chains, shafts and couplings are on hand depending on type of incher.
F. Once inside the mill with the liner handling machine, use a long pole and a water hose to knock balls and rocks from over head.
“Grinding Out”
Some semi-autogenous plants religiously “grind out” their mills at each liner inspection/maintenance shutdown in order to check the steel ball charge volume. This procedure, while admirable from an analytical mill application parameter standpoint, is devastation to mill liners and grates.
Grinding out exposes all the internals to severe impact conditions uncushioned by ore slurry. Grates tend to become heavily peened, especially those with relatively close slot spacing such as 10 mm to 19 mm (3/8 in. to ¾ in.). Although the slots usually clean up after further operation, there may be some reduction in capacity for a short time.
The shell liner assembly is particularly subject to damage during ball-on-liner contact as experienced during grind outs. A close examination of failed massive alloy steel liners only half worn, showed sub-surface fractures directly related to surface peening caused by heavy ball impacting. These sub-surface fractures progressed to the point of actual liner failure.
Mill manufacturers and experienced operators in this area have now learned to estimate the ball charge volume in a semi-autogenous charge using mill power draft and an average charge level as measured from mill centerline to top of charge. From a liner supplier standpoint, this method is certainly preferrable to grinding out.
The use of mill liner handlers has also reduced the need to grind out since they work close to the mill centerline and the leveled, de-watered charge at 30 to 35% mill volume becomes a convenient work platform for the maintenance crew.
Recommended Shutdown Sequence
Referring to the discussion on “grind out” above, the following procedures for shutdowns for inspection and maintenance are recommended so as to avoid mill interior damage.
A. Recommended sequence for Interior Inspection shutdowns:
- Shut off feed of ore.
- Shut off water.
- Allow mill to turn five revolutions to pump out slurry, and then cut power to mill drive motors.
- Hose and bar down interior to remove overhead muck and all lodged balls for safety. THIS IS IMPORTANT!
B. Recommended sequence for Liner Maintenance/Replacement shutdown:
- Shut off feed of ore – leave water on.
- Let power draw reduce to 90 to 93 percent of normal mill power.
- Shut off water.
- Let mill turn five revolutions then shut down mill drive motors.
- Refer No. A-4 above. THIS IS IMPORTANT!
By following the above procedures, liner life will be maximized and liner peening will be minimized. If not followed, there is a high chance of seriously damaging the liners and grates, especially with a high percentage of 5″ diameter balls as is frequently used.
Operation- General
- Keep good operating records of liner wear vs time or tonnes for various areas of the mill. Computer logging is a great assist.
a. Unscheduled maintenance shutdowns will be avoided.
b. Design changes for liner improvement need this “building block” basis. - Study wear patterns in mill and:
a. Work with foundry to select designs and alloys in a “composite” approach to combat localized wear.
b. Maximize liner casting size agreeable with:
– wear pattern.
– Liner handling equipment and procedures in order to minimize pieces and change time and maximize mill availability. - Carry high wear rate liners and fasteners in stock. Consider a complete set of spares.
- Consult your foundry-vendor for the latest alloy developments and design/application suggestions to reduce your cost/tonne ground.
Conclusions
- The optimum liner performance is only possible through proper liner design and material selection. The design should take into account the material’s properties and mill operating parameters. It is acknowledged, however, that each operation has a uniqueness that means there, is no “end all” design. .
- Work closely with the OEM mill manufacturer in the initial liner design. Assure the mill drilling provides the mill liner layout freedom required. Depend on the foundry source for input on liner design and material selection. The use of the foundry’s field experience on liner design, performance and material selection will help make good final design decisions.
- Recognize that other “non-mill” circuit equipment such .as pumps and flotation cells can have a direct effect on mill liner life.
- Analyze the foundry source and the integrity of the product received.
- Work with the foundry source to allow for good casting design so that the optimum material may be used.
- Look at the mill lining as a “composite” of materials and hardnesses rather than a single material selection for the entire mill.
- An ongoing liner evaluation is recommended to achieve the best wear profile. In many cases, the wear profile actually changes over a period of time and modifications to liner design must be made as an on-going program.
- Develop programs to mesh the three facets of successful implementation of high performance liners – designs, alloys, adapted applications.
Designs x Materials x Application → Higher Performance
Table I
Factors Influencing Alloy Selection and Liner Design
- Type of Mill
e.g. semi or fully Autogenous Mill. - Mill Size
- Mill Critical Speed
- Type of Mill Discharge
- Ore Type
- Ore Hardness
- Feed Size
- Product Size
- Media Size
- Wet or Dry Operation
- Pulp Density
- Presence of Tramp Steel in the Mill
- Media Charging Practice
- Media Trajectory
- Media Hardness
- Initial Loss of Effective Mill Diameter
- Wear Life or Interval Between Liner Changes
- Individual and Total Liner Weights for Handling Ease and Mechanical Loading of Mill Structure and Bearings
- In the Case of Separate Plates and Lifters – Balanced Replacement Intervals
- Possibility of Breakage
- Scrap Loss
- Manufacturing Limitations
- Loss of Lifting Profile as Liners Wear
