large sample divider (2) zoom

Hover

large sample divider (2) zoom

Hover

large sample divider (3) zoom

Hover

large sample divider (1) zoom

Hover

rotary sample divider drawing zoom

Hover

rotary sample divider capacity zoom

Hover

rotary sample divider dimensions zoom

Hover

rotary sample divider zoom

Hover

rottary splitter (5) zoom

Hover

rottary splitter (7) zoom

Hover

lab rotary sample splitter zoom

Hover

rottary divider (2) zoom

Hover

rottary divider (4) zoom

Hover

rottary divider (6) zoom

Hover

rottary splitter (1) zoom

Hover

rottary splitter (3) zoom

Hover

large sample divider (2)
large sample divider (3)
large sample divider (1)
rotary sample divider drawing
rotary sample divider capacity
rotary sample divider dimensions
rotary sample divider
rottary splitter (5)
rottary splitter (7)
lab rotary sample splitter
rottary divider (2)
rottary divider (4)
rottary divider (6)
rottary splitter (1)
rottary splitter (3)
Full Screen

Large Rotary Sample Divider

For those seeking a rotary sample divider of extra large magnitude, we have a 35 to 120 Liter hopper design for serious bulk sample preparation.canada manufacturer

At 500 lbs (230 kg), the 911MPETM-35/120L, sample divider is offered on singe phase 110 Volts/60Hz or 220 Volts/50Hz.

Options:

  • Casters
  • Vibrator of hopper
  • Enclosure
  • Conical hopper
test
Category:

Description

EXTRA LARGE HIGH CAPACITY ROTARY SAMPLE DIVIDER

(50 Liter Hopper in photos below)

rotary sample dividers


high capacity sample splitter

rotary sample divider dimensionsrotary sample divider drawing
rotary sample divider capacityrotary sample divider

35 Liter Sample Splitter

rottary splitter (3)rottary splitter (1)
rottary divider (6)rottary divider (4)
rottary divider (2)rottary splitter (5)
rottary splitter (7)lab rotary sample splitter

rotary sample splitterThis rotary sample splitter is supplied with two variable speed drives. The rotary table has a motor that will rotate from 0 to 53 revolutions per minute. The belt drive motor will give you 0 to 137 feet per minute (41 meters per minute). Upon the gravity flow and vibrator agitation from the feeding hopper, you will be able to achieve the desired splitting ratio by adjusting the speed of the feeding belt and the rotating table. See setup instructions on the following pages for details.

The collection containers supplied with these units are based on customer request at the time of ordering. There are many container divisions that are compatible with each machine. Feel free to contact the factory about different container divisions available for your machine.

Setup Instructions

Before you can begin splitting, it is important that the machine is properly setup for the material you plan on processing. Every material has unique properties so it is recommended to run several test samples using different settings to determine the optimal configuration for your material. Use the steps below as a guide to set up your machine.

Read all of the steps before proceeding with any tests. Some features need to be set up and adjusted at the same time.

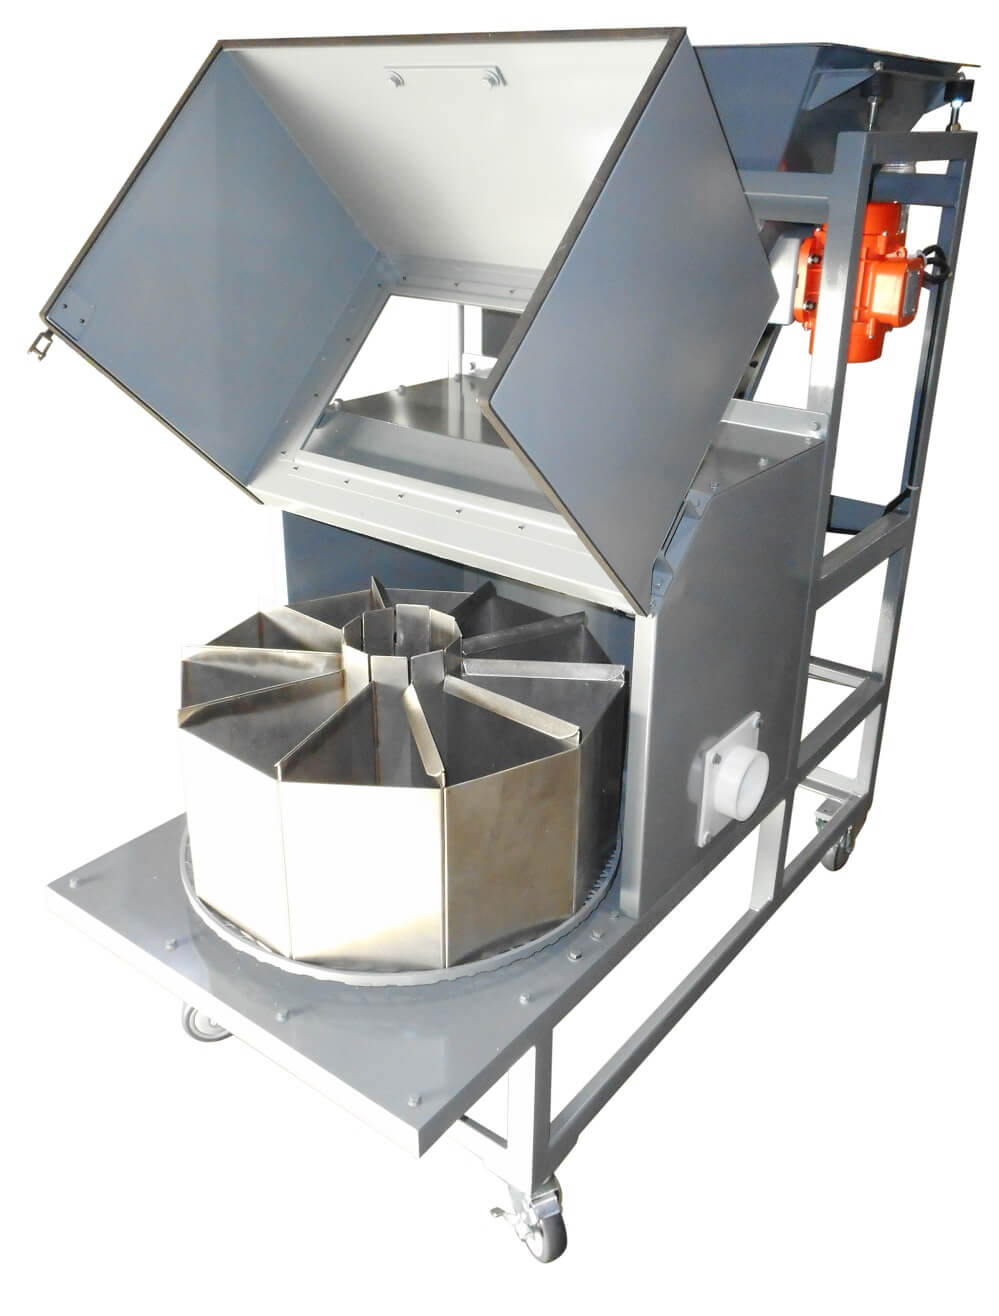
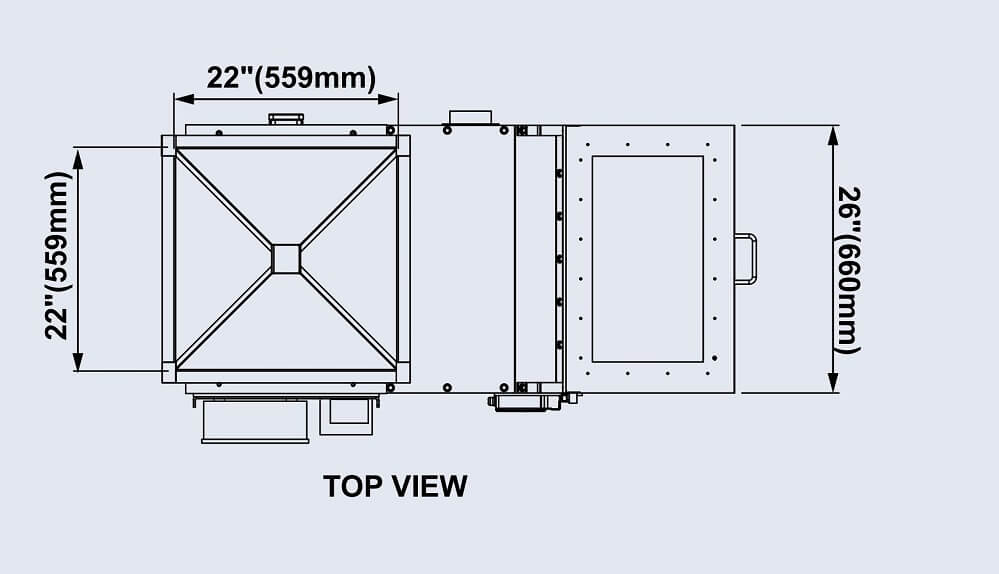
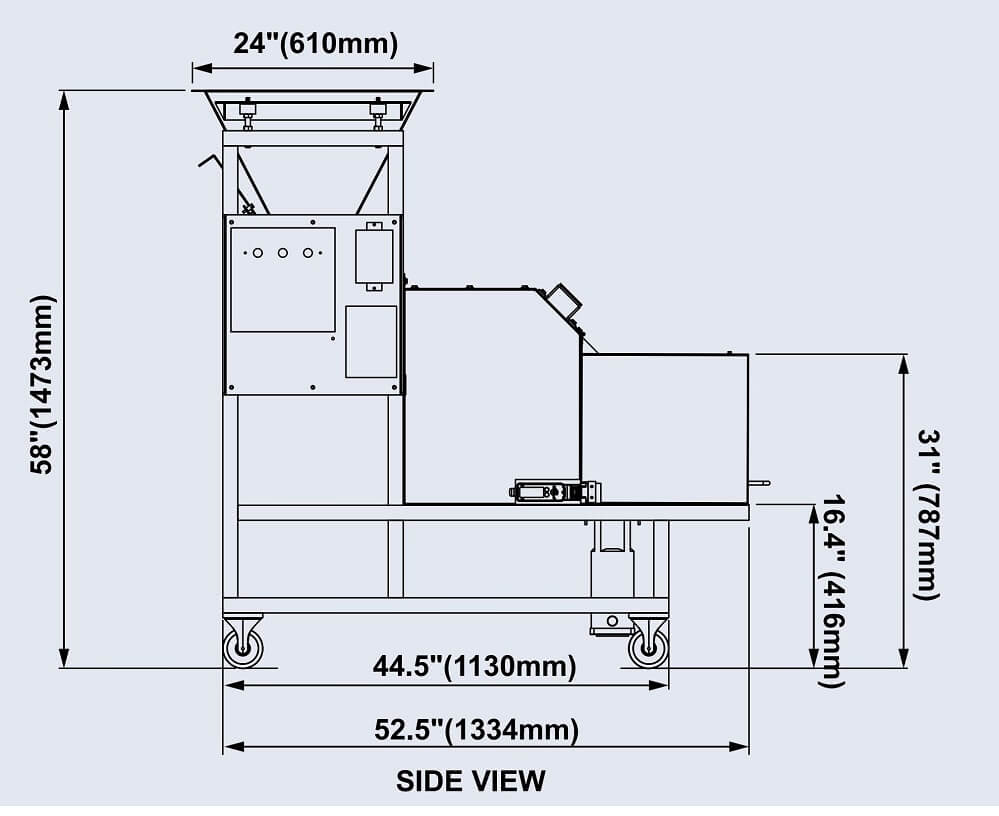
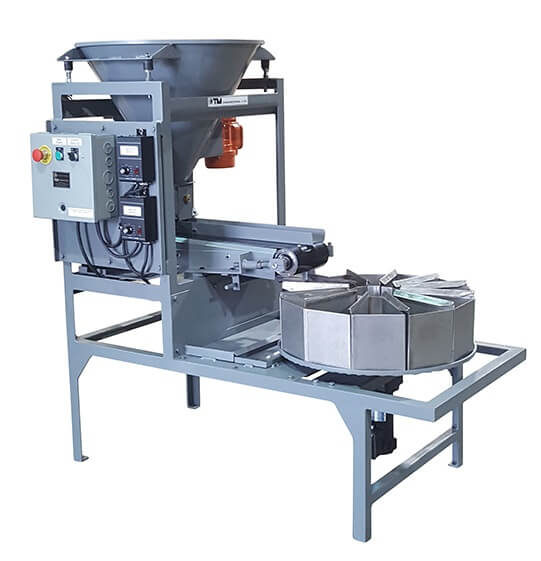
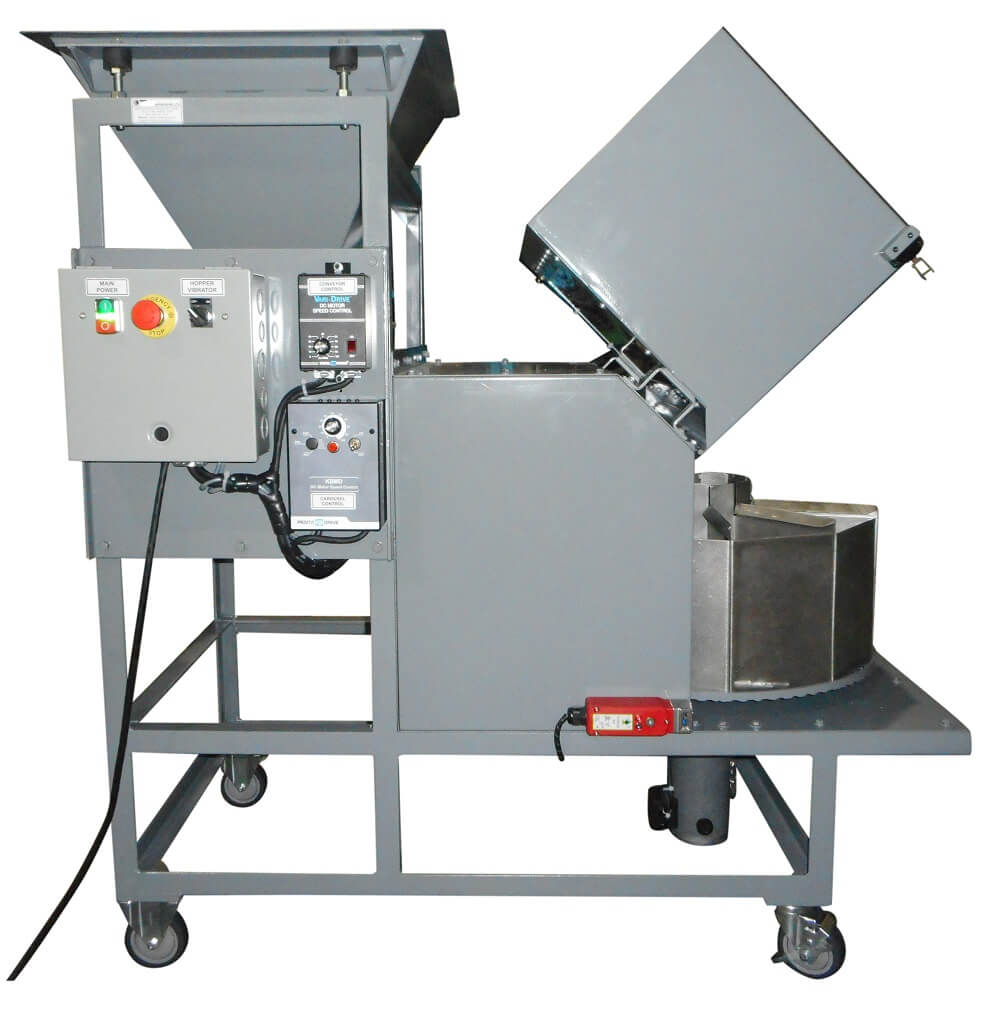
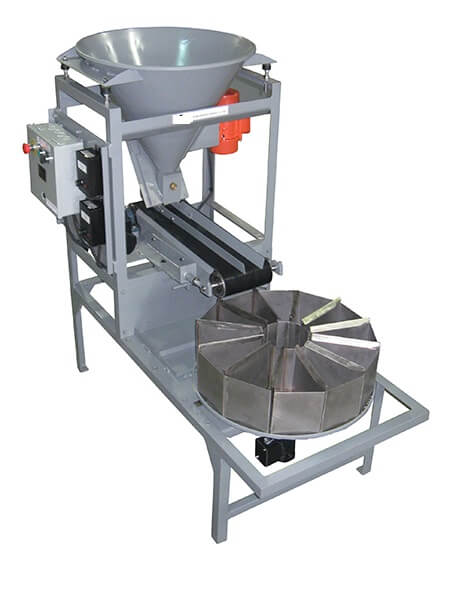
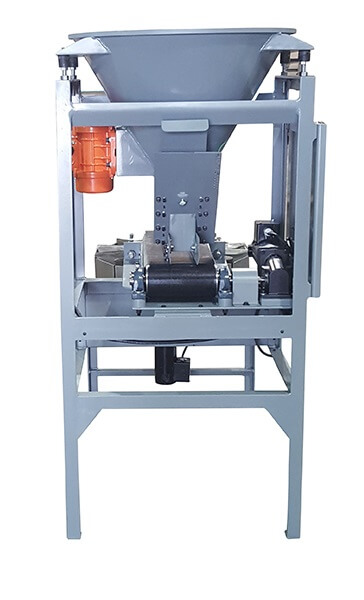
1.) Hopper adjustment:

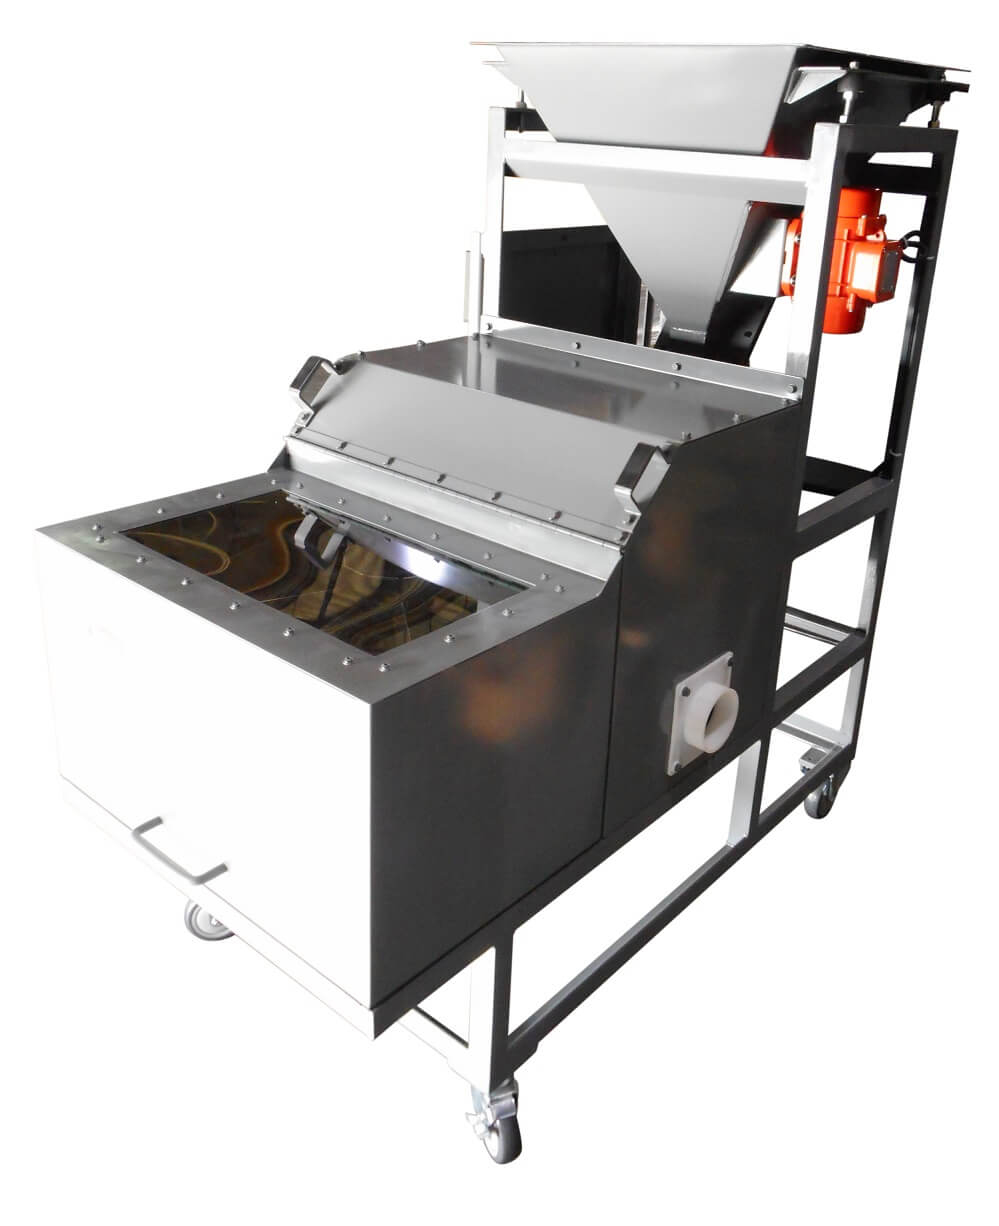
The height of the complete hopper/gate assembly can be raised or lowered to change the clearance where material falls on to the belt. Rotate the 4 adjustment screws (RS007) that hold it up on the top, making sure that they are all adjusted equally. For most materials it is recommended to leave the hopper at the factory preset height. Flow adjustment is achieved through the gate.

2.) Gate adjustment:

There are 2 sections of the gate that can be adjusted to regulate material flow. The main gate on the back can be set anywhere from all the way closed to fully opened. For very fine materials it is typical to have the gate set with less opening. Make sure that when splitting coarse materials the gate is set with enough opening for the largest particles to easily pass through. Experiment with different opening settings while running a test sample to find the optimal position for your material. Once satisfied with the opening setting, use the small knurled pin to mark the stop position on the series of holes on the gate.

The second adjustable feature is a small plate (RS005H) on the front side. Loosen the brass adjustment knob (RS005J) to slide this plate up and down. This plate should only be adjusted to skim the height of material as it flows out from beneath the hopper. Do not use it to restrict or cut off material flow completely, as it will cause wear on the belt.

3.) Carousel adjustment:

Turn the carousel on and use the dial on the control panel to adjust the carousel rotating speed while minimizing dust and particles flying out as material falls into the containers. Use good judgment to establish a suitable speed as you observe the way material falls.

4.) Conveyor Belt:

Before turning on the conveyor belt, fill the hopper with test material. Make sure that the gate is all the way closed before pouring material in.

With the carousel rotating, turn the conveyor belt on and open the gate. You should begin to see material moving from beneath the hopper on to the belt. The conveyor also has a variable speed control to adjust the speed at which material flows. Turn the dial to a point where you are satisfied with the rate of flow. You will want to adjust the gate opening settings at the same time.

5.) Hopper Vibrator: (optional)

Some machines are supplied with a vibrator on the hopper to prevent clogging at the output and sticking of material to the inside. This is not adjustable, simply turn it on or off and take note of the effect it has on the way material flows. Not all materials requires that the hopper vibrator be turned on.

Operating Instructions:

In order to safely achieve accurate and repeatable results, it is critical that you follow the operating procedure below. Refer to the setup instructions on page 3 before you begin running samples.

  1. Place all of the collection containers on the carousel tray and ensure that they are seated properly within the carousel edge. For machines supplied with reject collection capability, make sure the containers are properly hooked on the rotating carousel in the center.
  2. Pour material into the hopper. Make sure that the gate is closed all the way.
  3. Turn on the hopper vibrator (optional) if needed.
  4. Turn on the carousel motor and adjust to the desired speed.
  5. Turn on the conveyor belt and adjust it to the desired speed
  6. Open the gate to the preset position.
  7. Close the lid. (Optional)
  8. Let the machine run until all material has been collected within the containers.

Note: It is imperative that the carousel motor dial, conveyor belt dial, and hopper vibrator switch are not touched while splitting occurs, as this will cause inaccurate results.

Dust Extraction (With Optional Enclosure Only)

Units with an environmental enclosure are equipped with a 4″ diameter port on the side to use if your operation requires dust extraction.

When hooking up your dust extraction system, it is recommended to have an air regulating (Butterfly) valve installed to optimize air flow.

If dust extraction is not required, a cover plate has been supplied. Unscrew the duct outlet and screw the cover plate on in its place to block the hole.

Sample Splitter Cover Plate

Interlock Safety Switch (Optional)

Some machines are equipped with the optional interlock safety switch. This is designed to prevent the lid from opening when the machine is in operation. When the machine is powered on, and not operating, the lid can be opened and closed as needed. If there is no power to the machine the lid will remain locked. Should the lid need to be opened when the machine is not powered on, use a phillips screwdriver as shown below.

Sample Splitter Interlock Safety Switch 1

Rotary Sample Splitter – Parts List

RS001-50……………………………………………………..Hopper
RS002……………………………………………………..Feeding guides(2pcs)
RS002A…………………………………………………..Feed guides holder (2pcs)
RS003A………………………………………………………..Screw
RS003A-1……………………………………………………..Screw
RS003A-2……………………………………………………..Screw
RS003A-3……………………………………………………..Screw
RS003A-4……………………………………………………..Screw
RS003A-5……………………………………………………..Screw
RS003A-6……………………………………………………..Screw
RS003B-1……………………………………………………..Button head screw
RS003C…………………………………………………………Lockwasher
RS003D…………………………………………………………Washer
RS003D-1……………………………………………………..Heavy washer
RS003D-2……………………………………………………..Heavy washer
RS003E…………………………………………………………Nylock nut
RS003E-1………………………………………………………Nut
RS004-3………………………………………………………..Knife gate
RS005-2……………………………………………………..Feeder gate plate
RS005A……………………………………………………..Uhmw spacer (2pcs)
RS005B……………………………………………………..Nut (8pcs)
RS005C……………………………………………………..Sockethead screw (8pcs)
RS005D……………………………………………………..Pin (4pcs)
RS005E……………………………………………………..Screw (8pcs)
RS005F……………………………………………………..Thumb screw
RS005G……………………………………………………..Knurled stop pin
RS005H-1……………………………………………………..Slide plate
RS005J…………………………………………………………Brass knob
RS005K……………………………………………………..Spacer bar (2pcs)
RS005P………………………………………………………Screw (2pcs)
RS005Q……………………………………………………..Lockwasher
RS005S………………………………………………………Cable
RS005T……………………………………………………..Collar
RS005U……………………………………………………..Set screw
RS006……………………………………………………..Drive roller pillow block bearings (2pcs)
RS007-1……………………………………………………..Hopper screw (4pcs)
RS007A………………………………………………………Nut (4 pcs)
RS007B………………………………………………………Nut (4pcs)
RS007C……………………………………………………..Lock washer (4pcs)
RS007D……………………………………………………..Washer (4pcs)
RS007D-1……………………………………………………..Washer
RS007R-1……………………………………………………..Screw
RS007R-2……………………………………………………..Screw
RS007R-3……………………………………………………..Screw
RS007R-4……………………………………………………..Screw
RS008A……………………………………………………..Pillow blocks screw (4pcs)
RS008C……………………………………………………….Lockwasher
RS008D……………………………………………………..Washer (4pcs)
RS008E…………………………………………………………Nut
RS009………………………………………………………..Drive roller
RS010-1……………………………………………………..Drive coupling
RS010A………………………………………………………Key
RS010B………………………………………………………Key
RS011-1……………………………………………………..Conveyor drive gear motor
RS011A-1……………………………………………………..Screw
RS011B……………………………………………………..Conduit box (2pcs)
RS013-1……………………………………………………..Gear motor spacers (2pcs)
Spacers (4 sets)
RS014……………………………………………………..Pillow block bearing spacers
RS015-4……………………………………………………..Conveyor base
RS015A……………………………………………………..Mounting hardware (2sets)
RS016……………………………………………………..Conveyor tensioner (2 Pcs)
RS016B……………………………………………………..Screw (2pcs)
RS016C……………………………………………………..Lockwasher (2pcs)
RS017……………………………………………………..Tensioner nuts (4 pcs)
RS019-1……………………………………………………..Ball bearings (2 pcs)
RS020……………………………………………………..Circlips (2 pcs)
RS021……………………………………………………..Idler roller shaft
RS022-1……………………………………………………..Idler roller
RS023……………………………………………………..Variable speed control (conveyor)
RS023-1……………………………………………………Variable speed control (carousel)
RS024-3……………………………………………………..Machine’s frame
RS025-3……………………………………………………..Carousel motor
RS025A……………………………………………………..Key
RS026-6…………………………………………………….Carousel mounting base plate
RS027A……………………………………………………..Top coupling
RS027-7……………………………………………………..Bottom coupling
RS027K……………………………………………………….Set screw
RS027K-1……………………………………………………..Set screw (longer)
RS028-1……………………………………………………..Collection container (10 pcs)
RS029-2……………………………………………………..Carousel tray
RS031…………………………………………………………Conveyor belt
RS033-1……………………………………………………….Screw
RS033S……………………………………………………….Lockwasher
RS033T……………………………………………………….Washer
RS033U………………………………………………………..Nut
RS035A-1……………………………………………………..Enclosure top plate
RS035C-1………………………………………………………Left enclosure plate
RS035D-2……………………………………………………..Right enclosure plate
RS035E-2………………………………………………………Lid with hinge
RS035L………………………………………………………….Duct outlet
RS035S……………………………………………………..Sealing strip can be purchased by the ft.
RS035W……………………………………………………..Window
RS035EB……………………………………………………..Handle backing plate
RS035EH……………………………………………………..Handle
RS086…………………………………………………………Coupling cover
RS087-115……………………………………………………..Vibrator motor
RS089-1………………………………………………………Vibration isolator
RS090R-1……………………………………………………..Screw
RS090R-2……………………………………………………..Screw
RS090R-3……………………………………………………..Screw
RS090R-4……………………………………………………..Screw
RS090R-5……………………………………………………..Screw
RS090S……………………………………………………..Lockwasher
RS090T……………………………………………………..Washer
RS090T-1…………………………………………………..Heavy washer
RS090U……………………………………………………..Nut
RS091-1……………………………………………………..Uhmw strip for wiper
RS091K……………………………………………………..Holding bar and plate
RS091L………………………………………………………Bottom screw
RS091M……………………………………………………..Plastic wiper
RS091N……………………………………………………..Mounting screw
RS091P………………………………………………………Mounting block
RS091R……………………………………………………..Wiper screws
RS091S……………………………………………………..Counterbalance
RS091T……………………………………………………..Brackets for wiper (2pcs)
RS104-4……………………………………………………..Rear belt cleaner tray
RS104-5……………………………………………………..Front belt cleaner tray
RS105-6……………………………………………………..Belt cleaner base
RS105B-1……………………………………………………..Screw
RS105C-1……………………………………………………..Cover plate (2pcs)
RS105S……………………………………………………….Foam strip
RS108-3……………………………………………………..Lid stop (2pcs)
RS113A-3……………………………………………………..Front panel
RS117A………………………………………………………..Belt guard left
RS117B……………………………………………………….Belt guard right
RS129B……………………………………………………….Cable clamp
RS129B-1……………………………………………………..Cable clamp (smaller)
RS129S……………………………………………………….Screw for clamps
RS130A……………………………………………………….Swivel caster (2pcs)
RS130B……………………………………………………….Rigid caster (2pcs)
RS132……………………………………………………….Panel mounting plate

Control Panel – Parts List

RS115……………………………………………………….Terminal block (8pcs)
RS115A…………………………………………………….Terminal block (6pcs)
RS116……………………………………………………….Terminal end block (3pcs)
RS116A……………………………………………………….Terminal end (2pcs)
RS117………………………………………………………..Fuse holder (2pcs)
RS118-2……………………………………………………….Capacitor
RS118E………………………………………………………..Nut
RS119-1……………………………………………………….Push button
RS119A……………………………………………………….Emergency stop
RS119B……………………………………………………….Contactor
RS119C……………………………………………………….On/Off Switch
RS121……………………………………………………….Panel Box Cable
RS121R……………………………………………………….Clamp

Interlock – Parts List

RTS054-1……………………………………………………….Latch block
RTS055-110AC……………………………………………Interlock Switch
RTS055C-1……………………………………………………….Screw
RS003C……………………………………………………….Lockwasher
RS003A-5……………………………………………………….Screw
RS003A-6……………………………………………………….Screw


I Need Assistance