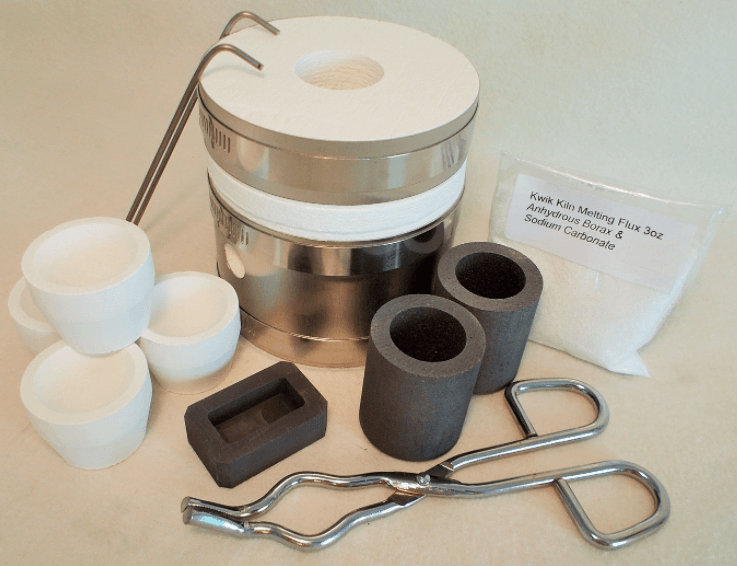
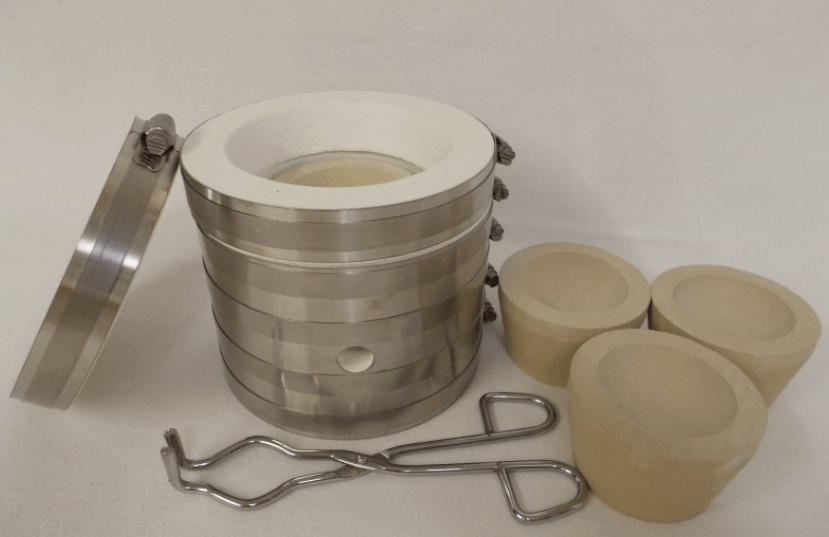
A Portable propane Gold Melting Furnace fired kiln designed to melt precious metals with speed and ease. Melt 1 to 6 oz of fine placer gold (1 to 3 oz silver). The Deluxe Kiln II Melting Kit includes:
Specifications:
Kiln weight: 1 lb
Size: 4″ tall x 4″ diameter
Stainless-Steel Jacket
2300°F rated refractory kiln material
The Deluxe Kit Includes:
Hybrid Kiln
4 Premium Bone Ash Cupels
8” Crucible Tongs
Cupel U Tongs
2 High Quality Dense NAC 500 Graphite Mini Crucibles
1 NAC 699 Graphite 2 oz gold / 1 oz silver Loaf Mol
3 oz Melting Flux
Instructions for Cupelling and Precious Metals Melting
** 2 MT200 pencil tip torches not included.
** Propane bottles not included.
These MT200 pencil tip torches are highly recommended by our designer as the ideal torches for use with our Kiln.
This mini kiln is not recommended for smelting ore concentrates, due to the limited capacity for both cons and refining flux 1 to 3 ratios.
Place the Small Gold Melting Furnace on a level, fireproof surface. Align the torches with the side ports and gently insert the torch tips approximately one fourth inch into the side ports of the Kwik Gold Melting Kiln. Secure the torches with a suitable device, to prevent the torches from rolling and to ensure that the valves and tips are parallel with the surface.
Remove one of the torches and light it. Adjust the valve so that you have a clean, blue flame approximately one and one half inches long. Re-insert the torch gently into the side port of the Kwik Gold Melting Kiln and replace the lid. Allow the Kwik Gold Melting Furnace to warm up for a few minutes, then slowly open the valve on the second torch until it lights. Once both torches are lit, remove the lid and adjust the valves on both torches until you have a clean blue flame protruding into the combustion chamber of the Kwik Gold Melting Furnace approximately one fourth to one half inch.
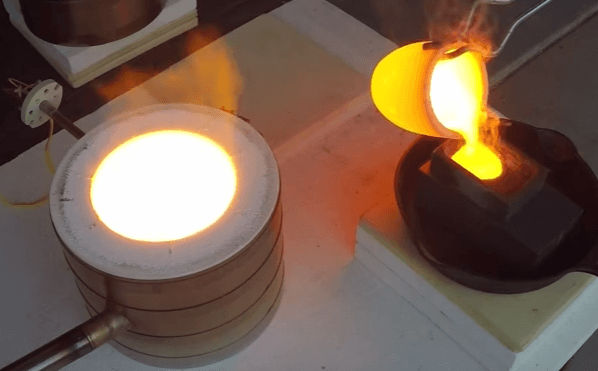
Replace the lid. You need to have approximately one fourth inch of clearance between the top of your melting crucible and the bottom of the lid when the crucible is placed into the Kwik Gold Melting Kilns combustion chamber and the lid is in place. Allow the Kwik Gold Melting Kiln to warm up to a bright orange while preparing your crucible melt. You should have a flame approximately 2” to 4” tall exiting the top port of the lid.
Place approximately one half to three fourths teaspoon of the melting flux into the graphite mini crucible, then up to 1 ounce of your clean placer gold, scrap gold or silver into the mini crucible on top of the flux. Utilizing your mini tongs, remove the lid from the Kwik Gold Melting Furnace, then place your crucible into the kiln, centering the crucible in the combustion chamber of the Kwik Gold Melting Furnace. Replace the lid on the Kwik Gold Melting Kiln and allow the crucible to heat up.
Product gallery
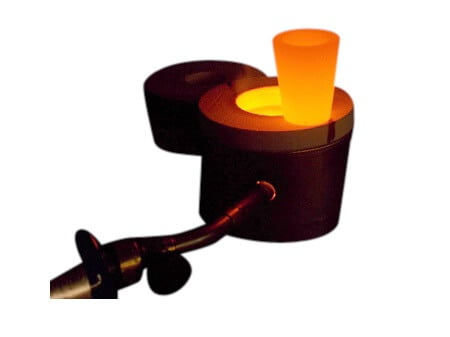
Important Tip: When melting your gold or silver, it is important to maintain a reduced environment (oxygen free) within the mini crucible. The mini crucible is made of graphite, which helps to promote a reduced environment by itself and, by directing the flame over the top of the mini crucible, you are going to create an absolute reduced environment during your melt. Slide the lid toward you approximately 1/4 of the width of the lid, so that you can still observe the melt taking place. Doing this directs the flame coming from the combustion chamber, alongside the backside of the mini crucible and across the top of the mini crucible, as the flame finally exits through the top port of the lid. This creates an absolute reduced environment by sealing the top of the mini crucible from atmospheric oxygen with the flame and speeds up the melt as well.
After your gold or silver has melted, allow the mini crucible to remain in the Kwik Gold Melting Furnace for a couple of minutes, so that it is hot enough (yellow heat) to pour into your mold, without the metal solidifying during your pour. If needed, you can carefully add more metal to the crucible until it is approximately three quarters full – approximately 6 ounces of gold or 3 ounces of silver. Once everything is hot enough, remove the lid from the Kwik Gold Melting Furnace using your mini tongs. Remove the mini crucible and pour slowly but purposely into your mold. After you pour your melt into the mold, the flux will seal the top of your melt from any atmospheric oxygen, so that you have a shiny, un-oxidized surface when you separate the gold or silver from the flux. We recommend a graphite mold, since it readily releases your pour from the mold without additional release agents or procedures needed.
Once your pour has cooled, remove the pour from the mold and tap the flux with a suitable tool until it comes free from your gold or silver.
Tip: If you want an unmarked ingot, gently tap the ingot with your tool until the easily removed flux comes off and then place your gold or silver ingot in a glass jar of white vinegar. The flux will dissolve overnight and your ingot will be shiny and unmarked after removing the loosened flux.
Please Note: The GPK K-Kiln is designed to be heated with 2 pencil tip PROPANE torches simultaneously. We will not warranty any GPK K-Furnace heated too high, improperly, or in a manner that goes against their design. This includes using other types of torches, or using Mapp gas, which gives off more heat. We recommend using propane only.
Crucible Erosion
External crucible erosion is directly related to the flame from the torches contacting the exterior surface of the graphite crucibles used in the Kwik Kiln. The graphite crucibles are slowly consumed during the process. However, If the torches are turned up too high, the blue pencil tip portion of the flame will cut grooves into the exterior of the crucible, causing premature failure of the crucible. The valves used on the Bernzomatic Torches are very touchy when the torches are placed on their side and no two torches seem to perform the same.
The following procedures will help to eliminate exterior crucible erosion:
Align the torches with the ports in the kiln and place the tip of them just inside of the stainless steel shell, approximately ¼” inch.
Remove one of the torches and light it. Adjust the flame to where the center blue pencil flame is approximately 1” to 1 ¼”. Lay the torch on its side and insert the torch into the port. With the lid and spacer removed, adjust the flame so that the tip of the blue flame penetrates inside of the kiln approximately ¼” to ½”.
Open the valve on the other torch and adjust the flame as described, so that both flames are equal. Place the spacer onto the kiln and let the kiln warm up for a few minutes without the lid in place. When the kiln gets hot, the blue torch flames seem to recede into the ports as the torches stabilize. Once the kiln is hot, the combustion taking place inside the kiln is much more efficient than when the kiln is cold and you can then re-adjust the flame until the blue pencil tip of the flame is penetrating into the kiln approximately ¼” to ½”.
Following the procedures described will help to eliminate the exterior crucible erosion and the kiln will ultimately reach the temperatures needed for melting. You can also rotate the crucible so that any grooving is not placed into the path of the flames entering the kiln, as well. Observing the interior of the Kwik Kiln and the flames in the daylight is difficult. However, if you take your Kwik Kiln outside at night, it’s easy to see what is going on inside of it. Carefully monitor your crucibles exterior as you use them. With proper adjustment of the torches, I have crucibles with over 20 pours on them.