bench top sample splitter zoom

Hover

sample splitter (22) zoom

Hover

sample splitter (14) zoom

Hover

sample splitter (15) zoom

Hover

sample splitter (16) zoom

Hover

sample splitter (17) zoom

Hover

sample splitter (18) zoom

Hover

sample splitter (21) zoom

Hover

sample splitter (23) zoom

Hover

sample splitter (24) zoom

Hover

sample splitter (26) zoom

Hover

sample splitter (28) zoom

Hover

sample splitter (29) zoom

Hover

sample splitter (31) zoom

Hover

soil sample splitter zoom

Hover

soil test sample splitter zoom

Hover

bench top sample splitter zoom

Hover

benchtop sample splitter zoom

Hover

high capacity sample splitter zoom

Hover

high volume sample splitter zoom

Hover

how do you calibrate a sample splitter zoom

Hover

laboratory sample splitter zoom

Hover

sample splitter (1) zoom

Hover

sample splitter (3) zoom

Hover

sample splitter (6) zoom

Hover

sample splitter (7) zoom

Hover

sample splitter (8) zoom

Hover

sample splitter (9) zoom

Hover

sample splitter (10) zoom

Hover

sample splitter (11) zoom

Hover

sample splitter (12) zoom

Hover

sample splitter (13) zoom

Hover

sample splitter tabletop zoom

Hover

sample splitter – benchtop zoom

Hover

sample splitter – dimensions zoom

Hover

sample splitter – capacity zoom

Hover

bench top sample splitter
sample splitter (22)
sample splitter (14)
sample splitter (15)
sample splitter (16)
sample splitter (17)
sample splitter (18)
sample splitter (21)
sample splitter (23)
sample splitter (24)
sample splitter (26)
sample splitter (28)
sample splitter (29)
sample splitter (31)
soil sample splitter
soil test sample splitter
bench top sample splitter
benchtop sample splitter
high capacity sample splitter
high volume sample splitter
how do you calibrate a sample splitter
laboratory sample splitter
sample splitter (1)
sample splitter (3)
sample splitter (6)
sample splitter (7)
sample splitter (8)
sample splitter (9)
sample splitter (10)
sample splitter (11)
sample splitter (12)
sample splitter (13)
sample splitter tabletop
sample splitter – benchtop
sample splitter – dimensions
sample splitter – capacity
Full Screen

Benchtop Rotary Sample Splitter

US$11,000

The main requirements for good sample splitting are that the gross sample should be dry and free falling. Several different types and sizes of rotary sample splitters are commercially available. The sample splitting device is suitable for all types of samples including segregates and fine material. The material is fed to the rotating distributor across an optional and recommended vibratory feed assembly. The sample material can be subdivided into two or more portions. The speed of the sample splitter is low at 0 to 50 RPM and permits a continuous dividing process producing representative portions.canada manufacturer

With a capacity of 1L to 25L, our 911MPEMT124 is an affordable rotary sample splitter for dividing small samples.

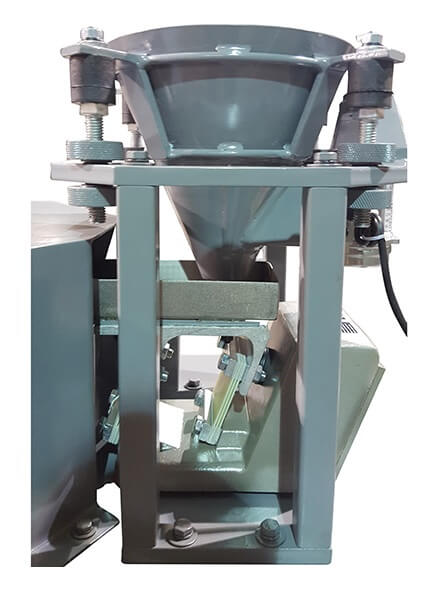
Composed of a SS gravity-fed hopper, vibrator feeder, and a small rotary divider.
Equipped with 10 stainless steel containers to collect approximatly 300ml to 2.5L each, that are fully interchangeable, self-aligning, and easily handled.

The units come with a mass flow hopper, vibrating feeder, and containers in various sizes to suit your application. The variable speed vibrator feeder and rotating carousel controls are provided at common voltages and will help prevent bulk material from arching or clogging.

The unit comes standard with a full dust enclosure (As shown below) and a 3″diameter dust extraction port on top.

This sample splitter is now available mounted on a heavy-duty steel cart with locking casters and adjustable shelves.

Wired at 110V or 220 volts, 1 phase, 50 or 60 hertz (to be confirmed when ordering).

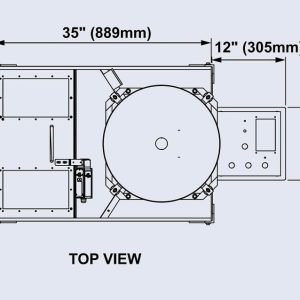
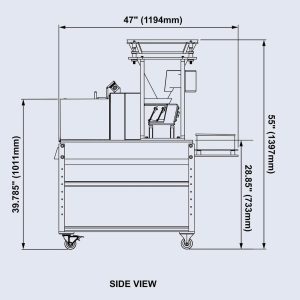
Approximate Dimensions: 20″ wide x 30″ long x 22″ high. Weight: 200lbs (90kg).

2″ diameter hopper discharge hole

3″ wide tapered to 4″ tray

test
Category:

Description

sample splitter (12)

Optional Dust Cover

sample splitter (13)

Optional Support Cart & Wheels

high volume sample splittersample splitter (8)

Optional Dust Cover

soil test sample splitter

Optional Vibrating Feeder

sample splitter (16)
sample splitter (21)sample splitter (17)
sample splitter tabletopsample splitter - capacity
sample splitter - dimensionssample splitter - benchtop

Sample Splitter Overview

This bench-type rotary sample splitter is supplied with two variable speed drives. The rotary table has a motor that will rotate from 0 to 53 revolutions per minute. The vibratory feeder motor will give you 0 to 11 feet per minute. Upon the gravity flow and vibrator agitation from the feeding hopper, you will be able to achieve the desired splitting ratio by adjusting speeds of the vibratory feeder and the rotating table. See setup instructions on the following pages for details.

The collection containers supplied with these units are based on customer request at the time of ordering. There are many container divisions that are compatible with each machine. Feel free to contact the factory about different container divisions available for your machine.

Sample Splitter Setup Instructions

Before you can begin splitting, it is important that the machine is properly setup for the material you plan on processing. Every material has unique properties so it is recommended to run several test samples using different settings to determine the optimal configuration for your material. Use the steps below as a guide to set up your machine.

1.) Hopper adjustment:

For very fine materials it is typical to have the hopper set closer to the tray. For coarse materials the hopper should be set high enough for the biggest particles to easily pass under the lower edge of the hopper.

The hopper can be adjusted up and down to change the opening height at the bottom. To do so, loosen the knurled knobs in the corners around the hopper. Adjust the hopper up or down as necessary and re tighten all 4 knobs.

2.) Rotary Carousel Adjustment:

Turn the carousel on and use the dial on the control panel to adjust the carousel rotating speed minimizing dust and particles flying out as material falls into the containers. Use good judgment to establish a suitable speed as you observe the way material falls.

3.) Vibrator Feeder Adjustment:

Before turning on the vibrator feeder, fill the hopper with test material. To prevent dust and overflow when loading the hopper with very fine material, pour a small amount in first to fill the opening at the bottom before pouring in the entire sample.

With the carousel rotating, turn the vibrator feeder on. You should begin to see material moving from beneath the hopper on to the tray. The vibrator feeder also has a variable speed control to adjust the speed at which material flows. Turn the dial to a point where you are satisfied with the rate of flow. You may want to re adjust the hopper height at this stage if material is flowing too fast, too slow or clogging.

4.) Hopper Vibrator: (optional)

Some machines are supplied with a vibrator on the hopper to prevent clogging at the output and sticking of material to the inside. This is not adjustable, simply turn it on or off and take note of the effect it has on the way material flows. Not all material requires that the hopper vibrator be turned on.

Operating Instructions of this Rotary Sample Splitter

In order to safely achieve accurate and repeatable results, it is critical that you follow the operating procedure below. Refer to the setup instructions on page 3 before you begin running samples.

  1. Place all of the collection containers on the carousel tray and ensure that they are seated properly within the carousel edge. For machines supplied with reject collection capability, make sure the containers are properly hooked on the rotating carousel in the center.
  2. Pour material into the hopper.
  3. Turn on the hopper vibrator (optional) if needed.
  4. Turn on the carousel motor and adjust to the desired speed.
  5. Adjust the vibrator feeder to the desired speed before turning it on.
  6. Close the lid and turn on the vibrator feeder.
  7. Let the machine run until all material has been collected within the containers.

Note: It is imperative that the carousel motor dial, vibrator feeder dial, and hopper vibrator switch are not touched while splitting occurs, as this will cause inaccurate results.

Dust Extraction

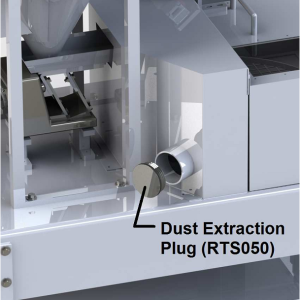
This unit is equipped with a 3″ diameter port on the side of the environmental enclosure to use if your operation requires dust extraction. The machine is supplied from the factory with a plug (RTS050) in the top of the port. To remove the plug, use a flathead screw driver to pry it up around the edges or hammer outwards on it from the inside side.

When hooking up your dust extraction system, it is recommended to have an air regulating (Butterfly) valve installed to optimize air flow.

If dust extraction is not required, leave the plug in the port.

Sample Splitter Dust Extraction Plug

Interlock Safety Switch (Optional)

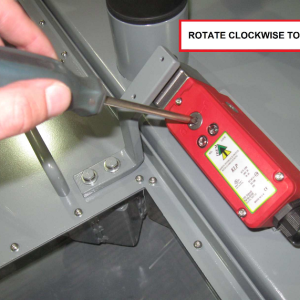
Some machines are equipped with the optional interlock safety switch. This is designed to prevent the lid from opening when the machine is in operation. When the machine is powered on, and not operating, the lid can be opened and closed as needed. If there is no power to the machine the lid will remain locked. Should the lid need to be opened when the machine is not powered on, use a phillips screwdriver as shown below.

Sample Splitter Interlock Safety Switch

Parts List for Bench Type Rotary Splitter

RTS001-5…………………………………………………Base
RTS002-7B………………………………………………Base mounting bar (2pcs)
RTS002-7P………………………………………………Hopper upright post (4pcs)
RTS002-7T………………………………………………Hopper support frame
RTS003-6………………………………………………..Lid with hinge
RTS003A…………………………………………………Screw
RTS003B…………………………………………………Handle
RTS003C…………………………………………………Handle backing plate
RTS003S………………………………………………..Rubber doors strip (can be purchased by the foot)
RTS004-6S………………………………………………Dust Enclosure
RTS006-4.5V……………………………………………Hopper
RTS011-3………………………………………………….Carousel Tray
RTS013-4………………………………………………….Feeder tray
RTS014-10………………………………………………Collection container (10pcs)
RTS015…………………………………………………….Vibrator feeder
RTS020-1…………………………………………………..Screw
RTS020A-1………………………………………………Bottom support Screws (4pcs)
RTS020B…………………………………………………..Upper support screws
RTS021A……………………………………………………Washer
RTS021C…………………………………………………….Lockwasher
RTS021D…………………………………………………….Screw
RTS021E……………………………………………………..Nut
RTS021F……………………………………………………..Washer
RTS022-3…………………………………………………..Hardware for control panel (4sets)
RTS022C……………………………………………………..Lockwasher
RTS022D……………………………………………………..Washer
RTS024-4……………………………………………………..Screw
RTS024-6………………………………………………………Nut
RTS024-7……………………………………………………..Washer
RTS024B……………………………………………………..Lock washer (8 pieces)
RTS024K……………………………………………………..Adjustment knob (8pcs)
RTS026-5…………………………………………………….Control panel plate
RTS026A-3…………………………………………………..Panel mounting bracket (2pcs)
RTS026B-1…………………………………………………..Panel Dampening Insert (4pcs)
RTS026C-1…………………………………………………..Underside Screw (4pcs)
RTS026D-1…………………………………………………..O-ring for posts (4pcs)
RTS026E………………………………………………………Countersunk Screw (4pcs)
RTS026F………………………………………………………Rubber Dampening Insert (4pcs)
RTS026G………………………………………………………Rubber Washer (4pcs)
RTS026-5………………………………………………………Plate for panel
RTS026J……………………………………………………….Screw
RTS027-1………………………………………………………Motor
RTS027B……………………………………………………….Gearbox
RTS027C………………………………………………………Mounting plate
RTS027D……………………………………………………….Screw
RTS027E………………………………………………………Lockwasher
RTS027F……………………………………………………….Shaft
RTS027G………………………………………………………Washer
RTS027H……………………………………………………….Key
RTS027J………………………………………………………..Key
RTS027A-1…………………………………………………….Cap plate
RTS027A-3…………………………………………………….Screw
RS027-10………………………………………………………Motor Coupling
RTS027K……………………………………………………….Set screw
RTS027K-1…………………………………………………….Set screw (longer)
RTS035A-1……………………………………………………..Screw
RTS035A-2……………………………………………………..Screw
RTS035-4……………………………………………………….Nut (4pcs)
RTS037A………………………………………………………..Screw
RTS037-1……………………………………………………….Hopper Vibrator
RTS043………………………………………………………….Hopper Vibration dampener (4pcs)
RTS044………………………………………………………….Complete Cart
RTS044A………………………………………………………..Shelf for Cart
RTS044B…………………………………………………..Swivel Caster for cart (with brake) (2pcs)
RTS044B-1………………………………………………..Swivel Caster for cart (no brake) (2pcs)
RTS045……………………………………………………..Frame mounting hardware (8sets)
RTS045A……………………………………………………Hardware for shelf (4sets)
RTS046B…………………………………………………….Door stop block (2pcs)
RTS046C…………………………………………………….Hardware for door stops (2sets)
RTS050………………………………………………………Plug for dust outlet
RTS052A-1…………………………………………………..Holding frame bar – shorter (4pcs)
RTS052B-1…………………………………………………..Holding frame bar – longer (4pcs)
RTS051-1………………………………………………………Window (2 pcs)
RTS053A………………………………………………………..Screw
RTS053B………………………………………………………Lockwasher
RTS053C……………………………………………………….Washer
RTS054………………………………………………………..Switch mounting block
RTS054A………………………………………………………..Screw
RTS054B………………………………………………………..Washer
RTS054C………………………………………………………..Lockwasher
RTS055-110AC……………………………………………….Interlock Switch
RTS055A……………………………………………………….Screw for interlock (4pcs)
RTS055B………………………………………………………..Latch for Interlock
RTS055C………………………………………………………..Latch mounting screw (2pcs)
RTS055D………………………………………………………..Safety torx bit
RTS056…………………………………………………………..Latch Bracket
RTS056A………………………………………………………..Latch Bracket Hardware (2sets)
RTS056B………………………………………………………..Screw
RTS056C………………………………………………………..Washer
RS129B………………………………………………………….Cable Clamp
RS130A………………………………………………………….Set screw
RS130B………………………………………………………….Set screw
RS130C…………………………………………………………..Nut

Control Panel – Parts List

RTS031-1………………………………………………………….Variable speed control for vibrator feeder
RTS032-1………………………………………………………….Variable speed control for carousel
RS115……………………………………………………………….Terminal block (4pcs)
RS115A……………………………………………………………..Terminal block (2pcs)
RS116……………………………………………………………….Terminal block (4pcs)
RS116A……………………………………………………………..Terminal end (2pcs)
RS117……………………………………………………………….Fuse holder (5pcs)
RS119-1………………………………………………………………Push button
RS119A……………………………………………………………….Emergency stop
RS119B……………………………………………………………….Contactor
RS019C……………………………………………………………….Selector switch (2pcs)
RS121C……………………………………………………………….Cable
RS121P……………………………………………………………….Plug
RS121R……………………………………………………………….Cable Clamp
RS121-1……………………………………………………………….Control box

Labels List

Label-bt002………………………………………………………..TM Engineering Label
Label-bt004………………………………………………………..Interlock Label
Label-bt005………………………………………………………..Main Power Label
Label-bt006………………………………………………………..Vibrator Label
Label-bt007………………………………………………………..Speed Control Label
Label-bt008………………………………………………………..Feeder Label


I Need Assistance