Gouging wear occurs in many mining operations , for example, where excavator teeth or loaders penetrate or drag over rock, and in jaw and gyratory crushers. Gouging wear is identified by the removal of a significant amount of material (a gouge) from the wear object after an encounter by the abrasive object in which the abrasive object also suffers damage. It is a type of high-stress wear that may be produced by either two-body or three-body conditions. The jaw crusher test gives high-stress, three-body abrasive wear. Jaw crusher wear tests were pioneered in the United States by Borik, improved by Fuller, and used abroad by Sare and Hall. The jaws that crush the rock are taken as the test specimen. Several investigators believe that the jaw crusher test gives the closest correlation to wear that occurs on earth-penetrating equipment, such as excavator teeth, power shovel buckets, scoops, and grader blades, as well as real jaw crusher wear. ASTM committee G.2 has developed a new standard practice for the jaw crusher gouging abrasion test.
The Bureau’s jaw crusher test equipment is considerably smaller than any reported in the literature. The smaller size gives greater economy of rock consumed and smaller specimen size. Typical values for the Bureau’s test compared with typical values used in previous tests are—rock consumed, 91 kg versus 910 kg; specimen size, 1 by 2.5 by 7 cm versus 2 by 7 by 15 cm; and specimen weighing precision, ±1 mg versus ±100 mg.
Jaw Crusher Equipment and Specimen
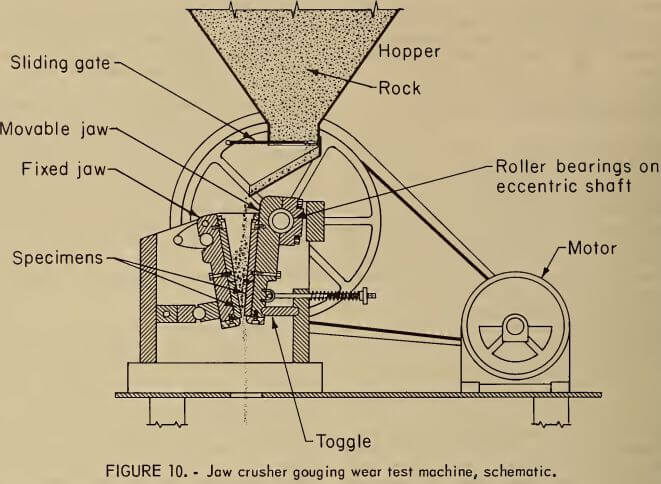
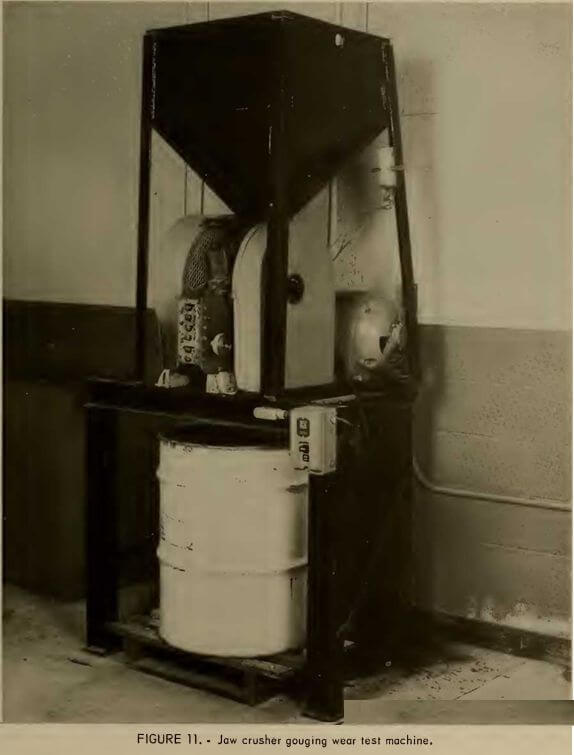
A small commercial laboratory jaw crusher was modified to accept an easily machined, identical pair of test wear plates and a similar pair of reference wear plates. One test plate and one reference plate are attached to the stationary jaw, and the other test and reference plates are attached to the movable jaw, such that a test plate and a reference plate oppose one another. A rock hopper and rock chute are attached above the jaw crusher. The arrangement of the jaw crusher test equipment is shown in figure 10, and a photograph is presented in figure 11. The jaw crusher operates at 260 c/min.
The jaw crusher was extensively rebuilt and strengthened in order to transform it from a crude laboratory crusher into a precision wear test apparatus. The jaw opening, originally 7.5 cm (3 in) wide, was reduced to 5 cm (2 in), thus providing a specimen width of 2.5 cm (1 in). An alloy steel eccentric shaft of larger diameter was made, heat treated, and fitted with needle bearings. New bearing blocks were made and welded to reinforced side plates. New jaws that would hold test specimens were made, and the jaw opening adjuster was redesigned and rebuilt. The original 1.1-kW drive motor was replaced with a 3.7-kW motor. Because of the many modifications, it is recommended that anyone wanting a jaw crusher test machine should design and construct a completely new unit instead of rebuilding an existing jaw crusher.
The test wear plates and reference wear plates have a 15° taper on each end for clamping to the jaws. All specimen surfaces are machined on a surface grinder. The small size of the specimens has a distinct advantage because previously used specimens from dry-sand, rubber-wheel abrasion tests can be used in the jaw crusher after regrinding. The standard reference material used is a

low-alloy steel, ASTM A514, with a Brinell hardness of HB 269.
The test gives wear of a test material relative to a standard steel. Because the test is relative, variables in the rock have little effect on test results. Therefore, the size distribution and mineral composition of the rock are not specified.
Jaw Crusher Procedure
After the four wear plates are cleaned and weighed to ±1 mg, they are clamped to the jaws with a standard plate opposing a test plate. The minimum jaw opening is set to 3.18 mm (0.125 in), and a 45-kg load of prescreened rock, minus 2 cm (¾ in), is run through the crusher. The minimum opening is reset to 3.18 mm, and another 45 kg of rock is crushed. The specimens are recleaned by vigorous scrubbing with a bristle brush. The volume loss may be calculated from the mass loss, determined by weighing, and the known densities of the test materials. A wear ratio is developed by dividing the volume loss of the test plate by the volume loss of the reference plate. This is done separately for the stationary and movable plates. The two wear ratios are then averaged for a final test ratio. The smaller the figure for the wear ratio, the better the wear resistance of the test plate.
Jaw Crusher Typical Results
After crushing 90 kg of rock, the typical weight loss of the standard steel specimen was 0.4 g on the fixed jaw and 5 g on the movable jaw. The wear ratios of test specimen to standard steel are given for several materials in table 6. Tests on materials having greater abrasive wear resistance than the standard gave wear ratios less than 1. For example, hardened AISI 4340 steel gave a wear ratio of 0.157, and a high Cr-Mo white cast iron,


Note.—Minimum jaw opening set at 3.18 mm (0.125 in); standard jaw of A514 steel, HB 269; 90 kg (200 lb) of rock crushed.
known for its superior abrasive wear resistance, gave a wear ratio of 0.0823.
The precision of the jaw crusher is determined after every six test runs. This is done by making a run in which all four specimens are of the standard steel. The average wear ratio of the two pairs of specimens must be 1.000±0.030, according to ASTM recommendations on the jaw crusher test. The average ratio for the Bureau’s tests fell within this limit.
