The pin-on-drum abrasive wear test involves high-stress, two-body abrasive wear. One end of a cylindrical pin specimen is moved over an abrasive paper, abrading material from the specimen and crushing the fixed abrasive grains. The wear is believed to simulate wear that occurs during crushing and grinding of ore-processes in which the abrasive particles are crushed, therefore called high-stress abrasive wear.
Considerable pin-abrasive wear testing has been conducted on pin-on-disk equipment, beginning with Robin’s machine in 1910. This machine wore a pin sample along a single track on the surface of an abrasive cloth fixed to the flat surface of a disk. Khruschov made a major improvement by making the pin follow a spiral path, like a phonograph, to always encounter fresh abrasive. The work on this type of machine, reviewed by Moore, helped establish the effect of many parameters, such as abrasive material and size, specimen load, and speed, on two-body abrasion. Climax Molybdenum Co. developed a pin-on-table machine with several improvements over the pin-on-disk machine. Using a converted milling machine, the moving table with abrasive attached provided a constant surface speed. The test specimen was rotated to abrade the pin surface from all directions. Using the operating parameters from the Climax machine, Mutton at Melbourne Research Laboratories developed a pin-on-drum abrasion machine in which a slowly rotating drum was substituted for the moving table. The Bureau’s machine is very similar to the Melbourne machine except for a few minor refinements. These latter three machines all can use the same type of abrasive, path length, load, speed of abrasive, and rotational speed of the specimen.
Pin-on-Drum Equipment and Specimen
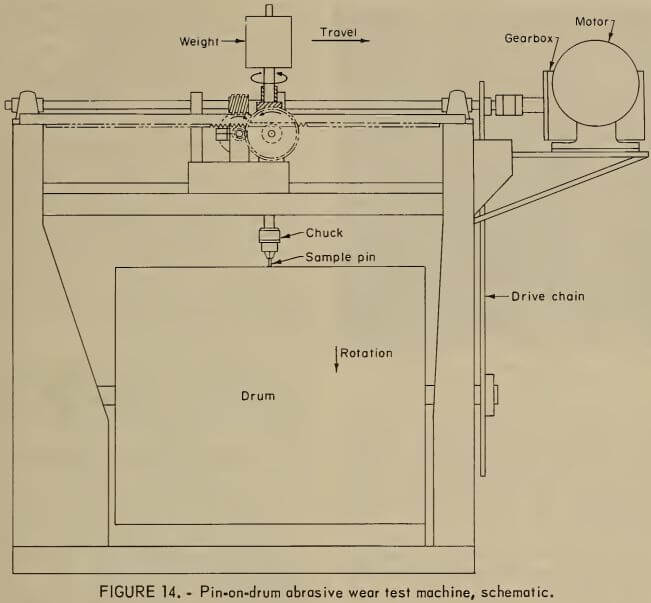
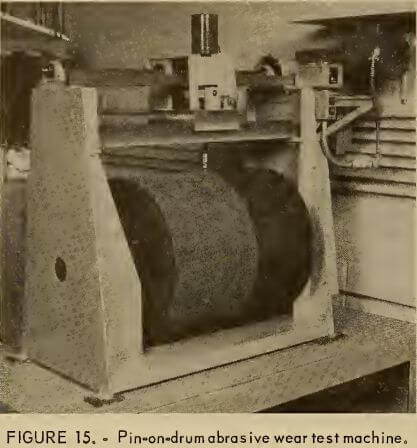
The equipment consists of a head that rotates the test specimen while traversing the length of a cylindrial surface of a rotating drum covered with abrasive paper (figs. 14-15). The head has three functions. First, it loads the specimen. Second, it translates the specimen slowly along the drum so that only fresh abrasive is encountered. Third, it rotates the test specimen to produce wear scars in all directions across the end of the specimen. The applied load is normally 66.7 N. The 0.5-m-diam drum is covered with abrasive cloth, either Al2O3, SiC, or garnet of the desired size, usually 120 to 150 mesh. The abrasive cloth is obtained in rolls, 61 cm wide, from a commercial source. During operation, the pin traverses 12.7 mm parallel to the axis of the drum while the drum makes one revolution. The wear path is 1.6 m per drum revolution. The drum rotates at 1.7 rpm to give a surface speed of 2.7 m/min. The pin specimen rotates at 17 rpm. Through a system of gearing, a

single motor drives the entire machine, which automatically stops after completing a preset number of drum revolutions. A gear-disengaging mechanism allows repositioning of the specimen at intervals of 6.35 mm along the drum.
The test specimen consists of a pin 6.35 mm in diam by 2 to 3 cm long. Specimens are normally prepared by machining in a lathe; hard or brittle metal specimens are cut out by electrodischarge machining and then are finish ground in a lathe. Specimens over a wide range of hardness, including soft magnesium and hardened white cast iron, have been evaluated.
Pin-on-Drum Procedure
A new test specimen is worn in for approximately four revolutions, or until its entire end displays wear scars, before beginning the test runs. The test of a material requires two runs—one on the test specimen and one on a standard specimen. The number of drum revolutions is chosen to provide a reasonable amount of wear, that is, about a 40-mg loss. This requires about 6 revolutions (9.6-m path) for soft materials and 12 or more revolutions for hard materials. After the test specimen has been run, the standard specimen is run for the same number of drum revolutions with its track

exactly between the tracks left by the test specimen. The standard material is a low-alloy steel, ASTM A514, with a hardness of HB 269. The standard specimen wear is used to correct for small variations in the abrasiveness of the abrasive cloth from lot to lot and within a given lot.
The corrected mass loss of a test specimen for a given abrasive type under a given load is
W = WxS/1.6Sx,
where, W is the corrected mass loss of the test specimen per meter of path length,
Wx is the measured mass loss of the test specimen for x number of revolutions,
Sx is the measured mass loss of the standard specimen for the same x number of revolutions,
and S is the long-term average mass loss of the standard specimen per drum revolution.
Specimens are cleaned ultrasonically in water with detergent, rinsed in water, rinsed in alcohol, and air-dried before each weighing.
Test materials of approximately the same density, such as irons and steels, can be compared by weight loss. Materials of differing density should be compared by volume loss. Thus, the wear is reported as cubic millimeters (volume loss) per meter (path length) for a 66.7- N load on the given abrasive.
Pin-on-Drum Results and Discussion
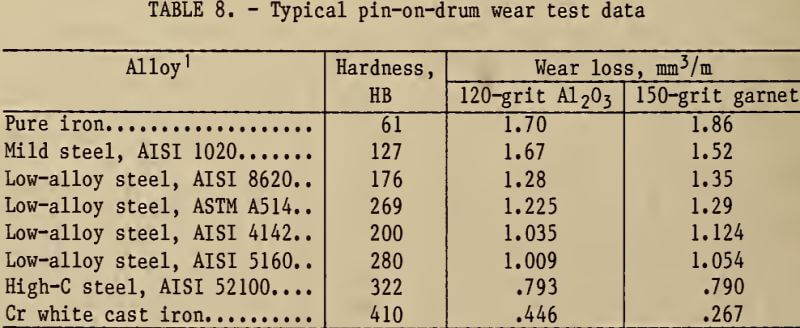
This test apparatus has proven useful in ranking a wide range of materials under the conditions of two-body, high-stress wear. Table 8 shows typical results for a variety of materials, using

Al2O3 and garnet abrasive cloth. The garnet gives a greater spread in wear values. The results show that wear on pure iron can be reduced to about one- half by alloying to form steel and to about one-fourth by alloying to make white cast iron.
The reproducibility of the test has been very good. In repeating a test immediately, the coefficient of variation has been less than 2 pct. Results on materials retested after several months’ time with a different lot of abrasive cloth differed by less than 5 pct from the earlier results.
A set of 12 specimens was used to compare wear on the Bureau’s machine with wear on the pin-on-table test of Climax Molybdenum Co. The results gave very nearly the same ranking of materials, but the wear on the Climax machine was consistently about 11 pct less for the same load, path length, and abrasive type.
