Table of Contents
The Taber Abraser is a commercial wear tester designed to test the abrasive wear resistance of flat specimens of a wide variety of materials including coatings, paints, metals, plastics, paper, textiles, ceramic tile, and etched or printed material on glass. The wear condition can be classified as low-stress, two-body abrasive wear. The model 505 Taber Abraser, located at the Rolla Research Center, can test two specimens simultaneously, a feature useful for rapidly obtaining duplicate tests or for comparing two materials.
Taber Abraser Equipment and Specimens
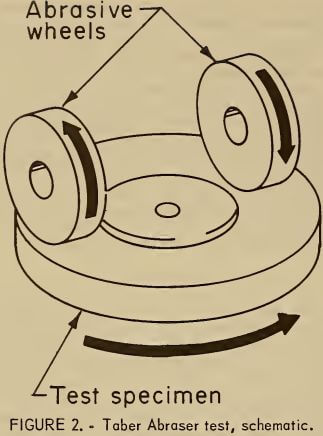
Wear occurs by the action of a pair of abrasive wheels in contact with the specimen. The specimen is rotated at 72 rpm

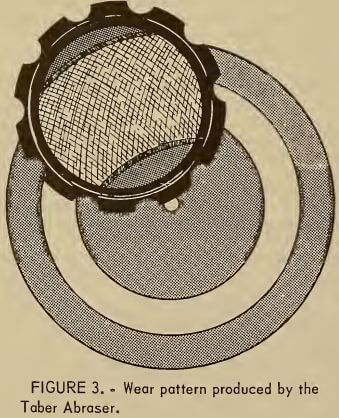
 by a turntable, as shown in figure 2, which causes the abrasive wheels to drag and rotate. The horizontal axis of each abrading wheel is displaced from the vertical axis of the test material to produce the abrading motion between wheels and specimen. The abrasive action results in an “X” wear pattern over a ringed area of the specimen (fig. 3).
Test specimens range from 10 cm square to 16 cm in diam, depending upon the specimen holder. A hole of 6.4 or 9.5 mm is required in the center of most specimens . An area of 30 cm² is exposed to abrasion. The abrading wheels used for a test are selected to provide the desired abrasive quality. Five types of standard abrading wheels and other special wheels are available from the manufacturer. The wheels may contain silicon carbide or alumina abrasives over a range of particle sizes and may be bonded with either rubber or resin.
Taber Abraser Procedure
A test is conducted by placing the desired specimen on the turntable. The desired weight load is placed on the arms carrying the abrasive wheels. Loads of 125, 250, 500, or 1,000 g may be selected. The test is run continuously for a prescribed number of revolutions of the specimen: 10, 100, 1,000, or whatever the desired number. The count is displayed, and the unit will automatically stop at the prescribed count. A vacuum pickup collects abraded particles.

The test results may be evaluated by four methods, according to the manufacturer:
- Visual endpoint method. Certain materials are best evaluated by observing the point at which they undergo a marked change in appearance or break down physically. By this method, the number of test cycles recorded on the counter is a wear index (rate of wear) of the sample. Materials that lend themselves best to this method are plated, glazed, or polished surfaces; paper; textiles; and fabrics.
- Weight-loss method. The weight- loss method of evaluation can be used when test results are compared with those of similar materials with about the same density. In this case, the Taber wear index is the loss of weight in milligrams per thousand cycles of abrasion for a test performed under a specific set of conditions.
- Volume-loss method. When comparing the wear loss of materials of different density, it is usual to use the volume loss. The weight loss is converted to volume loss by dividing by the density of the material.
- Depth-of-wear method. It may be desirable after abrasion tests to measure the depth of wear. This can be done with an optical micrometer calibrated in increments of one ten-thousandths of an inch.
Because of the wide variety of materials tested, types of abrasive wheels, loads, and revolutions, typical results cannot be reported. For a mild steel using a load of 1,000 g for 1,000 revolutions, the weight loss is about 30 to 60 mg, depending upon the type of abrasive wheel used.
Abrasion Resistance Test of Refractory Materials
The Bureau’s abrasion resistance test equipment for refractory materials is located at the Tuscaloosa Research Center. The equipment and test procedure are described in ASTM designation C704-76a, entitled “Standard Method of Test for Abrasion Resistance of Refractory Materials at Room Temperature”. The method covers the determination of the resistance of refractory brick to a sandblast stream. The test measures the volume of material abraded from a flat surface at a right angle to a nozzle through which 1,000 g of size-graded silicon carbide grain is blasted by air at 448 kPa (65 psi). The test condition is classified as low-stress, two-body abrasive wear. The condition is considered low-stress because silicon carbide is tougher and more wear-resistant than the refractory brick normally tested.
A schematic of the test equipment is shown in figure 4. A sandblast gun fitted with a glass nozzle directs the abrasive toward the brick test specimen, which is enclosed in a dust-tight chamber. A bag on the vent from the chamber collects the dust. The precision of the test was found by round-robin testing to be ±15 pct.
